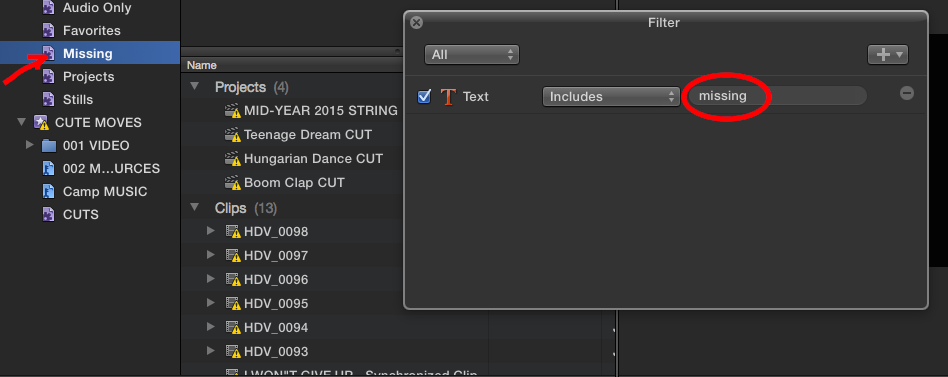
This is very useful. Matt Goddard posted this on Facebook, and I though I’d pass it along. Create a Library level Smart Collection, and set it to search for text that includes “missing”. It will find and list all missing media. Also, T. Payton points out that you can perform this search in the Timeline Index as well. Thanks guys! 🙂
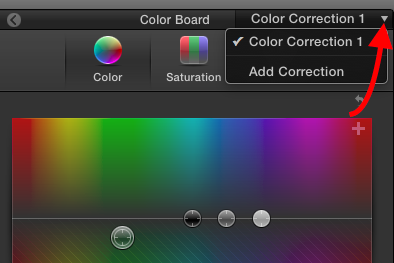
This is a really quick tip. Before FCP X 10.2, there was a little + sign in the Inspector Color tab to add additional Corrections. With the changes to Color in 10.2, that little + is gone but… you don’t have to leave the inspector to add more corrections.
Apply your first correction to a selected clip via CMD-6. Make your adjustments. Then, in the Color Board, click the pop up menu in the upper right to add additional Color Effect instances. Easy.
Also, if you often make multiple corrections and want to set a bunch of masks before making adjustments, simply apply multiple “blank” Color Effects to a clip and save it as a preset. Apply it as needed and just delete the unused instances. Saves some clicking back and forth between panels. 🙂
This is a very cool little $5 iOs app from Apogee. Designed for Sennheiser clip-on mics, (will work with anything, including a built in mic), you can record, and add markers, Roles, Favorites and Keywords in the app. Then export audio and fcpxml to Dropbox, and import into FCP X. All the metadata comes with it. Also, you can control recording, add markers, mic levels, and Favorite takes… from the Apple Watch. I don’t have an Apple Watch, but if I did more location recording, this would be a great reason to get one. 🙂
It’s a free download and records 60 seconds until it’s unlocked. You can unlock via $5 in-app purchase, or for free (limited time offer it seems) by just plugging in an Apogee or Sennheiser device. I recorded and marked up a couple takes today, and here’s what came into FCP X. Great use of technology. I bought it, and I don’t even need it. lol
After the usual rabid anticipation, Apple today released FCP X 10.2 along with companion updates to Motion and Compressor. The UI has been subtly updated for Yosemite and there are some great new features; beautiful 3D text, the ability to save effects applied to clips – including grades – as custom presets, new and improved keyframeable masks, Library level Smart Collections, improved key framing performance, 4-Up Scope viewer, and a lot more.
I’ll look at the new stuff in a moment, but as someone who uses FCP X regularly, the most exciting and flat out impressive part of this update for me is it’s performance… summed up in the usual vague “bug fixes and performance improvements” part of the release notes. In my view, here’s what it should say:
“This Version of X Feels Like a New App”
If you’ve been holding off on updating to Yosemite (at least 10.10.2 is required) you should, uh… stop holding off right now. The FCP X team has done some crazy under the hood work to X, it’s almost like a different app. Very… snappy. There have been some legitimate past gripes about slow/stuttery UI, memory leakage, slowdowns, and just general sluggishness with certain projects. In some cases even crusty old FCP 7 felt more responsive than X. Well, that is no more. Done.
FCP X 10.2 is fast, and performs much better than previous versions regardless of project length. UI animations don’t seem to slow things down, fast forward/reverse play is silky smooth and, for you old-skool types, J/L rock-n-roll scrubbing works just as you’ve always dreamed it should. lol In short, Apple has dialed this thing in amazingly well. It’s not a subtle difference, you’ll notice it immediately. Trust me, update your OS if needed, and install 10.2. Be aware that 10.2 will update your Libraries so, as always, make backups!
In addition to greatly improved performance, there are also a number of really cool new features in 10.2. Some are things that have been requested, some complete surprises. I’ll start with one of the surprises:
New 3D Titles
My review of this addition? hmmm… I guess it’s “Holy Sh*t!” It’s the real deal, not some faked extrusion. Seriously, this is simply amazing 3D text. It looks as good as anything you could do in a dedicated 3D program, and basic titles will play back in real-time, unrendered.** I’ve exported some 5k titles and it’s really crisp, no aliasing on the edges during moves, just gorgeous. You can also convert any 2D titles you’ve made to 3D with a click or two.
**depending on how crazy you get with surfaces etc…
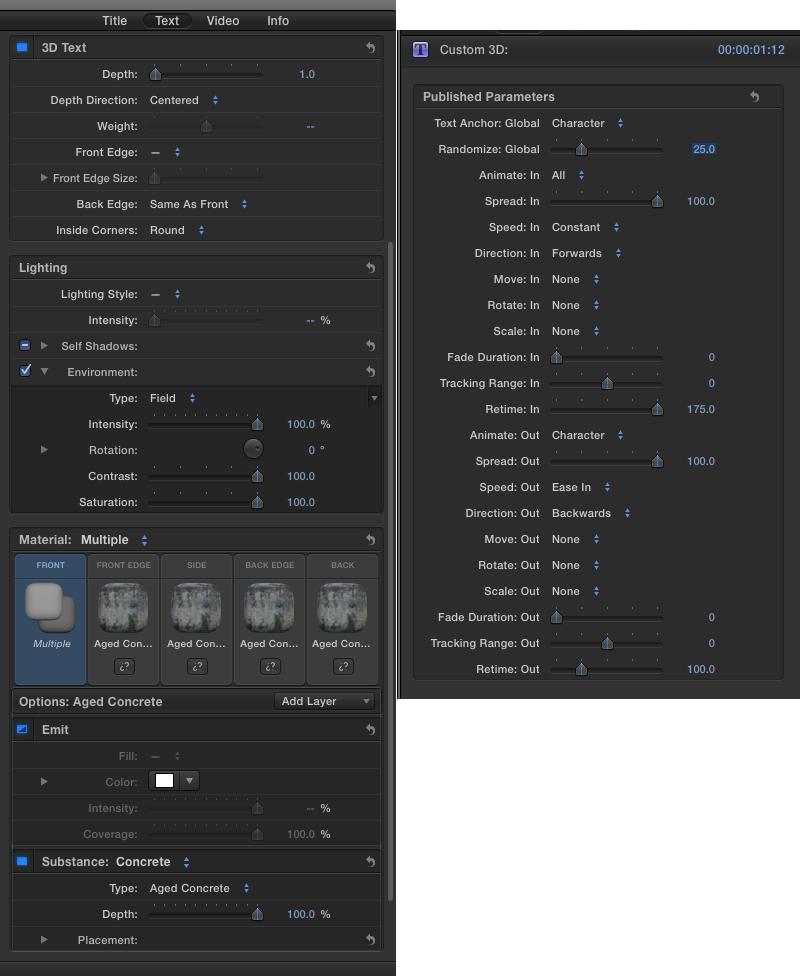
While a lot of the animated moves are presets (which can be adjusted) the amount of control you have over the 3D environment is mind-boggling. There are hundreds of combinations of materials, lighting, edges, environments, shadows, etc. Yet, at the same time, it’s really simple.
Here are pretty much all the 3D titles with some adjustments piled on top of each other. Don’t ask… This did not play in real time unrendered. lol
And if you need something other than the preset animation, you can open the 3D Title templates in Motion to add more lights, cameras, and tracking.
If you want to “roll your own” so to speak, the 3D Titles are available in Motion as well with much more functionality available. Next up…
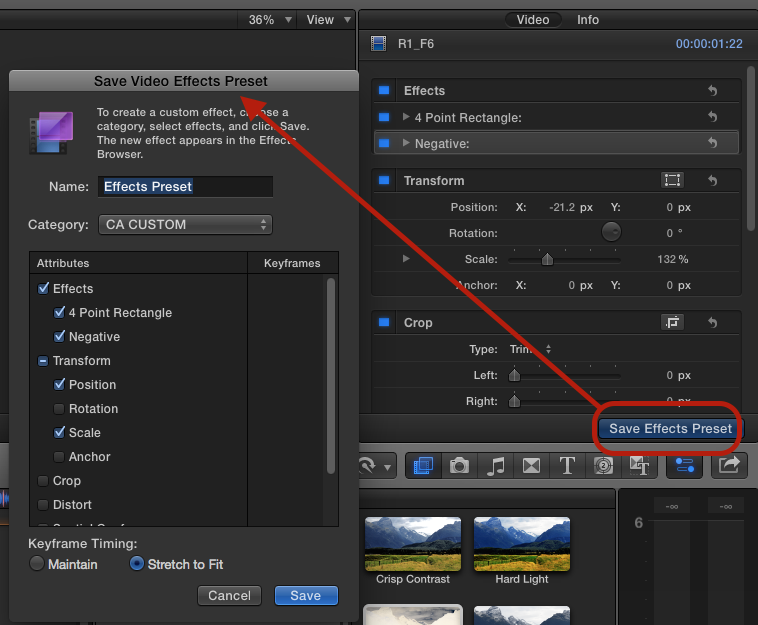
Custom Effects can be Saved as Presets
Another huge feature that has been requested by many users. Any applied effects or adjustments to clips in the Inspector can now be saved as Effects Presets which will be available in the Effects Browser.
What will be especially appealing about this feature to many users is it’s utility with Color Correction/Grading. This is due to another new feature:
Color Correction is now an Effect
The Color Board has been integrated into the new Color Correction Effect. Note: As this is now an Effect, theColor panel will no longer appear in the video tab in the Inspector. You must specifically apply the Effect to a clip to access the Color Board and Corrections.
Similar to previous versions, the Color Board/Color Correction Effect can be quickly applied via the Enhancement Menu (or CMD-6). In 10.2, it can also be accessed by applying it via the Effects Browser. To add multiple Corrections, apply additional Color Correction Effect instances from the Effects Browser.
Since it is now treated as an Effect, you can apply color correction before video filters, or insert multiple color correction filters anywhere in the stack of video filters. After you stack and arrange the processing order of multiple corrections and filters in the Inspector, you can save this look as an Effects Preset for for re-use.
Also, when Pasting attributes you can now choose to apply specific corrections individually.
Other nice improvements – the Softness slider of Color Masks is now keyframeable, and Masks can now be renamed.
Also, Shape and Color Masks are now available in every effect.
And speaking of masks:
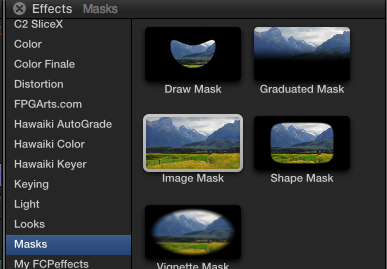
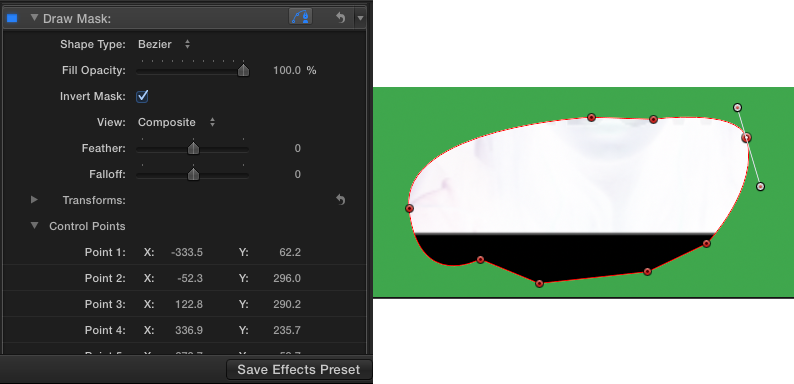
New Draw Mask and Improved Shape Mask
Great new additions to the masking capabilities of FCP X, masks now have their own category in the Effects Browser. They’re all easy to use and fully keyframeable.
The new Draw Mask has options for linear, bezier, or B-spline smoothing. Lot’s of control, accurate, and very smooth when drawing. In general, key framing is much better overall in FCP X 10.2.
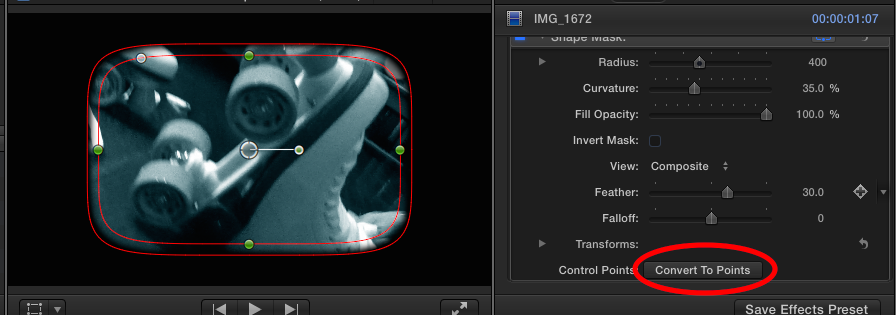
The Shape Mask has been radically improved with much more detailed controls and better UI.
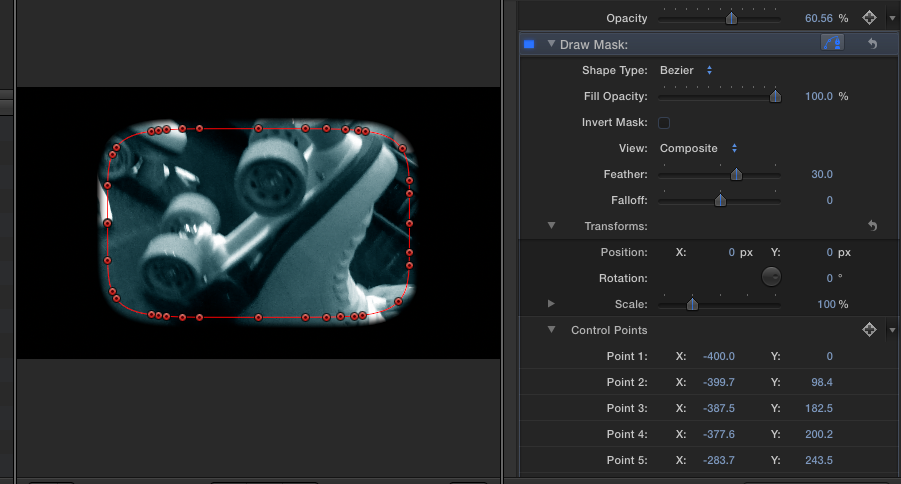
Also, you can convert the mask to keyframeable Bezier control points…
So… lots of improvements to effects, and some great new additions. Next…
4-up, Custom Scope View
You can now arrange and view up to 4 Scopes simultaneously. Happy?
Smart Collections at the Library Level
Create and save Smart Collections for an entire Library. X creates a Folder full of them by default, but you can delete them, change them, or make your own just as you do in an Event. Very useful.
Improved Optical Flow and Rate Conform
Optical Flow has been improved, and it looks amazing. If you have clips with Optical Flow in an updated 10.1.4 Library, when you select the clip you’ll see an additional, greyed out Optical Flow setting in the menu to let you know. You should choose the new setting and re-apply.
Rate conform functions are more accurate as well. No pretty pictures of this stuff… 🙂
Streamlined Import Window
The Import Window in 10.2 has been nicely re-designed, it kind of resembles Compressor now in that all the options are available in one sidebar. Much easier to see all your import settings at a glance.
New FCPXML 1.5, Preserving Legacy DTD’s
As usual, FCPXML has been updated to encompass all the new features in 10.2. What’s not usual, is that you can still choose to export FCPXML 1.4. This means that all your 3rd party apps that use xml won’t suddenly “break” if they’re not ready for todays update. A really nice feature to address an issue that probably keeps some folks from updating as soon as they’d like to. Meaning right now…
In addition to the photogenic features above, 10.2 also includes GPU rendering and dual GPU support when using Send to Compressor, GPU-accelerated RED RAW processing (requires updated plugin), support for Panasonic AVC-Ultra, Sony XAVC-S and JVC H.264 Long GOP. Motion and Compressor also include a slew of new, updated and improved features.
To sum up… This FCP X update deserves the big version jump to 10.2 for the performance improvements alone. Apple has done a lot of work on the guts of this version, all the shiny new stuff is just icing on the cake. It’s a great update, and well worth the wait.
One note: There have been some changes made to FxPlug under the hood as well, so if you use FxPlug based effects you should confirm with the vendor that they are compatible. I’ve had no show-stoppers, but I am an idiot that updates immediately and then puts out fires… and I have had a couple minor (to me) plugin issues. You should probably make sure, especially if you’re using these effects in ongoing work.
So there you go. Install FCP X 10.2 as soon as you can. You will be happy you did.
UPDATE: Version 2 of the plugin was released in June, 2015. This comparison was done using V.1.
UPDATE: Added AE Keylight comparison…
If you do a lot of keying, in FCP X or *cough cough* Premiere, you really need Hawaiki Keyer.
Easy to use but super powerful, beats the built in keyers and at $49 US won’t break the bank. Been playing with it today and it’s really nice. I can get great results, and I really don’t know what I’m doing. 🙂
It’s an FxFactory plugin, and works in FCP X, Motion, Pr and AE. Check it out, and check out the comparison below, view it at full size for the best look…
Yet another in my infrequently updated series of tips. As usual, you may know this, but if you don’t you should. You’re using the clip skimmer right? You should be. OPT-CMD-S turns it on. With it you can skim individual clips to see and hear what they are. Very useful for compositing and Projects with piles of audio. This tip is about using it to make overcutting picture in FCP X much more pleasant.
In my glamorous world, we’ll often start cutting with a source, and then after some time, we get an updated source. We then go through our cuts and replace all the clips with the new source. It’s a common task in many workflows, VFX in particular. Always fun in any NLE.
The replace commands in FCP X are very nice, but there’s currently one common command missing, match frame replace. Most of the time, this isn’t a big deal, you can always find a match at the head or tail of a clip. But if the head or tail is buried in a transition, then match frame replace – to match to a frame in the visible portion of a clip – is what you use. In FCP X, it’s not there. But, as usual, there’s a simple way to deal with this… the Clip Skimmer comes to the rescue!
In my usual rambling, semi coherent fashion, I’ll show you how in the short video below. If you’re familiar with the overcutting process, you can skip to about 2 minutes in for the actual tip. Hope you find it useful!