So… in my first post here, I told a long winded story about getting FCP V.1 in 1999, bringing it to work, setting it up on an old Performa next to my Avid, cutting – and somehow managing to finish – a spot with it. This eventually led to my company switching from Avid to FCP, and others in town followed. Blah, blah blah…
Anyway… in a Facebook thread, me and a bunch of other geriatrics were reminiscing about the first FCP versions we used. In the course of this trip down memory lane, I did a search for the spot and… holy crap, it was there. On the Internets.
So, here it is. From late Jan or Early Feb 2000. Probably FCP V1.2?
In a recent thread on Creative Cow, we were discussing the difference between Pr CC’s new Essential Graphics Panel and FCP X Motion Templates. As is often the case, it somehow morphed into a discussion of 3D Object creation and animation an NLE. Or something… I dunno, it’s the Cow, it gets weird over there sometimes. 😉
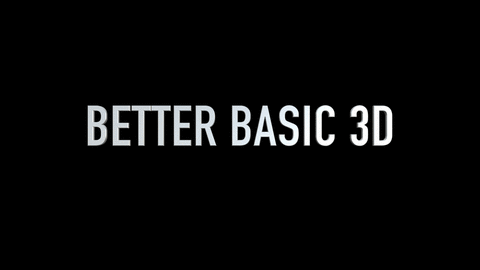
Anyway… at some point I made a quick little animation to show what you could do in FCP X without leaving the NLE. It literally takes 10-15 min to whip up a decent looking animation, and I’m sure it would look better if you spent more time.
NOTE: The stock Basic 3D Title – which I used for this – has no X/Y/Z rotation keyframes.
For more animation fun, a while ago I made a version that is keyframe-able if you want it:
“Marginally Better Basic 3D“
forgive the lame video names and descriptions… I hadn’t planned to post these…
Someone then wondered how it was done, so I did it again, and made a little movie showing the entire process. I’m sure there are actual tutorials about doing this if you look around, but here’s the basic idea…
1-find a picture of the object/logo you want to use
2-make it into a font and install the font
3-animate it as 3D text.
Again, other than making the font, this was all done in FCP X without using any 3rd party tools or other programs. It’s very easy. Apple certainly doesn’t advertise FCP X as 3D modeling software, but it’s pretty cool what you can throw together without leaving the timeline. None of this required rendering either, which is a bonus.
Update: The release of FCP X 10.3 has made R.O.M unnecessary. It still works, but you don’t need it. If you’re using an older version of FCP X then it’s still useful, but you should update FCP X. 🙂
Update: Version 3.2 is out with a fix and revised instructions to avoid duplicating FCP X default audio Roles. In short, do not capitalize “dialogue”, “music”, or “effects” when setting your Roles. They’ll show as capitalized in FCP X when reimported. Only non-cosmetic change to the app is the default “dialog” Role in the prompts is now lowercase. (Thanks Sasu!)
Previous Update: Version 3 now renames Audio Components to match your Roles and Subroles. Components with existing custom names can be renamed, or left as they are.
If, for some reason, you do not want this renaming feature, click here to download Role-O-Matic 2. Same app minus the component renaming bit…
Ever need to set audio Roles on lots of multichannel clips? Open each one in a timeline, set the Roles, repeat ’til the end of time. Role-O-Matic ends the drudgery!
This little app allows you to batch apply common Roles and SubRoles on any number of A/V and Audio-Only clips, even if they have different channel configurations, all at once. If you have 6 reels of a DME split feature, tons of dailies or location audio, you can now set the roles on all channels in all the clips at once. It also names the audio components to match your roles and subroles, so you can see what they are in the Inspector and Timeline.
Put all the clips in an Event, Export fcpxml, run it through Role-O-Matic, and reimport. If you don’t understand why you would need this, don’t download it! If you do understand why it’s useful, I think you’ll like it.
The code that does the work was generously donated by someone smarter than I, so it’s probably not gonna change too much unless you are a coding guru and want to help me with it. It works great, and doesn’t modify any files or change your original fcpxml, so it’s pretty benign. It’s very easy to use, but please read the instructions carefully. They’re with the app or you can click here to read or download them now.
Here’s a little demo/tutorial in my trademark rambling, semi-coherent style. As a bonus it was recorded with a crappy USB headset so I sound like Darth Vader, but without the cool vocal effects. I highly recommend turning on auto generated subtitles for some comedy. 🙂
Current known issues listed below. Will update here and in the app read me as needed.
In some cases certain channels in some clips may be muted/disabled in the Event created from R-O-M fcpxml. Simply unmute/re-enable them
Using spaces and other “illegal” characters may result in no Roles being set.
If you have files with interleaved stereo channels that are actually dual-mono, such as a lav on the left and a boom on the right, or interleaved surround files etc, Role-O-Matic cannot add separate Roles to each component, only to the “master” component.
If clips have names in their metadata, and are then renamed in the inspector before you export xml, it puts the custom name in another element that ROM won’t change. For newly imported clips it should work as expected. Worse comes to worse you can always batch name ’em in the inspector though..
When reimported, stereo components/channels may be labeled “Reverse Stereo”. This isn’t caused by R-O-M, it happens even if you just re-import your original fcpxml. The stereo imaging is not changed, it’s just labeled incorrectly. I’ve sent feedback to Apple on this, you should too.
The imported Event will have the same name as the exported original with a “2” appended. The workaround is to rename the original Event before Importing the new fcpxml, or rename the new one when its imported. Or something. 🙂
It’s beta-ish, Please let me know if you have any problems not noted above.
I like the new 3D titles in FCP X, not for making ridiculous extruded atrocities, but for just a subtle touch. It can really make your text look better. The preset animations are pretty good too. Sometimes though, you want to do your own little moves, and the titles from Apple don’t have any keyframe-able scale or rotation parameters. Even the Inspector’s Video tab only has a single “Rotation” adjustment.
So… I made a copy of the Basic 3D Title, opened it in Motion, turned off the canned build in/out controls, and published Scale and Rotation XYZ parameters. For the heck of it I also published the Shear parameter. The Z scale parameter is kinda the same as 3D Depth, but I left it anyway…
You can do it yourself, but if you don’t feel like it, Click Here to download it. Hope it’s useful. And please do modify it and make it better! I really don’t know what i’m doing. 😉
… blog posts. While all 3 of you are waiting for something interest from me, you should check out something interesting from Light Iron. The videos of their FCP X Focus workflow event. Good stuff!


 This little app allows you to batch apply common Roles and SubRoles on any number of A/V and Audio-Only clips, even if they have different channel configurations, all at once. If you have 6 reels of a DME split feature, tons of dailies or location audio, you can now set the roles on all channels in all the clips at once. It also names the audio components to match your roles and subroles, so you can see what they are in the Inspector and Timeline.
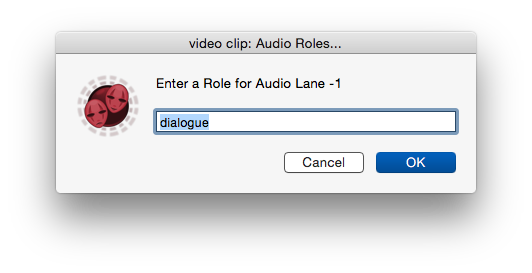


