Well, the wait is over, Motion and Compressor have finally been updated!
Oh, hold on… Final Cut Pro X 10.3 was released today too right?

It’s been a long time coming and for good reason… it’s a major update, arguably the biggest yet. Since everyone on the internet will be writing about these updates in depth, I’ll be providing the TL;DR (too long;didn’t read) version for FCP X and talking about what it’s like to actually use it. Let’s start with the headline features, then go a little in depth.
Headline Features
Brand New UI
Redesigned Timeline 2.0 with optional Role Organization
Color Code Roles
Re-Order Roles in the Timeline
Timeline Clip Height KB Shortcut now properly works in Timeline
Add Roles on import manually or using iXML, in the Inspector, or TL Index.
Batch Assign Roles in the Inspector
New MXF and DPP Metadata Views (Apple cares about pros!)
Remove all Effects or Remove Attributes.
Customizable, Recallable Workspaces
One Click to add Audio-Only Fades (set this in Editing Preferences under Audio)
Optional Full Height Inspector
Copy/Paste Timecode
Add Effects to master Roles in a Compound Clip (Role based mixing.)
New Audio/Music Browser with Waveform Preview
Optional Continuous Play in the Browser (set this in the View Menu Browser options)
Consolidate custom Motion Templates in a Library (set this in Library Inspector or right click a Library in the Browser)
Open Libraries from an SMB NAS
Built in Flow (morph) Transition
Source Timecode Generator and Effect
Check the release notes, there’s a lot more. New Pro formats, Full screen Timeline on a second monitor (and other 2 display options), XML Import into existing Events (loving this!). It’s pretty clear now why this took a while to appear, it’s kind of a whole new app. FCP X 10.3 will run on macOS 10.11.4 and up.
As I said… Rather than just listing all the features – you can find those in the help menu or online – lets have a look at what it’s like to actually use this beast.
Brand New User Interface
Dark, flat, and in my opinion, way better to work with than the old version… I use a bunch of NLE’s and this version of FCP X is by far the easiest on the eyes. Many buttons, controls and Menu options have moved and/or been consolidated in a much more logical fashion. It takes a minute to figure out where everything is, but it really makes much more sense in day to day use.

The Music & SFX Browser moves to the main browser window, and gains a skimmable waveform view. Titles and Generators now appear in the Browser as well. Put the Browser on a second monitor as I do at work, and it’s much easier to hunt for stuff.
Also, you can now store Motion Templates in the Library if you want. You set this in the Library Inspector or by right clicking a Library in the Browser, very straightforward. Now when you share or archive Libraries, any custom Motion Templates can travel with it. This is a big deal for folks who collaborate on jobs and use custom Templates. Remember that any plugins that are not stored in the Motion Templates Folder will still need to be installed on all machines on which you open the Library.

New Wide Gamut Options and Viewer Range Check
New settings allow editing and output in Rec.709 or Rec.2020 (Wide) color space. Compatible monitors are necessary for wide gamut display. You can set the color space for individual Projects, or an entire Library. Note that in order to change a Project from Rec 709 to Wide you must first set the Library to Wide. You can then flip individual projects between the 2 color spaces.


In the Viewers, the option to display Range Check overlays has been added. Most people may not need this, but it’s essential for professional broadcast work.

Customizable Recallable Workspaces
There are a few default sets, and you can now create and save your own custom layouts as well. New buttons have been added to quickly switch from single to dual monitors, Show/Hide the Timeline and Browser, and you can choose a myriad of different combinations of what you’d like to show in each Workspace or on either monitor. The option to put a full screen Timeline on a second monitor is one of my favorites. Save as many arrangements as you want. It’s very cool, very simple to work with, and very nicely done. Workspace settings can be easily revealed in the Finder to copy to other systems if you want.


Remove Effects and Remove Attributes
Another much requested feature, and it’s implemented really well. You can select a group of clips and remove all the applied effects if you want. Or, using a window much like Paste Effects, selectively remove any Transform parameters, Effects, or combinations of each. Very nice, and worth the wait. And here’s a treat for you… Match Color now can once again copied and pasted or saved with a preset, it’s no longer orphaned as it has been since 10.2.0.

 Full Height Inspector
This is super useful. You can show the Inspector as you always have, or with a keystroke it expands to the full height of your monitor. Really nice to have this, especially with Effects that have lots of controls.

Work With Libraries From SMB NAS
You can now open Libraries that are stored on NAS drives via SMB. No fancy setups, hardware or voodoo needed. I have a 2013 Mac Mini running OS X Server with a bunch of Promise Pegasus drives attached to which I connect via a GB Ethernet switch, and it works perfectly for me. This ability was seen as a “missing” feature that is being put back in, but it’s one of those things that make one wonder what Apple has up their sleeve.
For some reason I wasn’t able to copy existing Libraries on my computer to the server (likely a permissions issue on my end), but I’ve created new Libraries on the server and they work just like local Libraries. Waveforms and thumbnails refresh a tiny bit slower, but that’s probably due to the Ethernet speed, not FCP. Very nice to have this for those of us who work in collaborative environments.
Timeline 2.0 – Roles
OK, here’s the thing everyone will be talking about… After revamping most of the other parts of X over the last few years, Apple have finally tackled the Timeline. Roles, which have always been at the heart of how FCP X works, are now supercharged. What this means is that it’s more important than ever to assign and use Roles effectively.
To facilitate this, you can now assign custom Roles on import, and you can use embedded iXML data to automatically assign Audio Roles when importing. You can also batch assign common Roles on components of multichannel masters in the Audio Inspector (no need for Role-O-Matic anymore), rename and assign Roles in the Inspector, in the Timeline Index, or by right clicking a clip, or selected group of clips, in the Timeline or Browser.
In short, it is now much easier to assign Roles to clips no matter where you are in the app. Roles are of course searchable in the Index, and you can now search for clip types – Audition, Compound Clip, Multicam and Synchronized Clips.
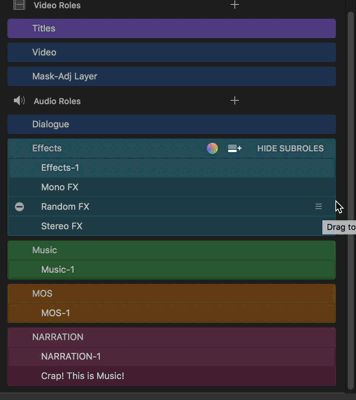
Role Colors
And something everyone has been clamoring for has appeared… you can assign colors to your Roles too. That’s right, Roles can be assigned different colors from a default palette. Now we can make our timelines look just as hideously colorful as Avid and Adobe!
Kidding aside, it’s good to finally have this option. Any changes to Roles are Library based, if you always want different colors than the defaults, you’ll need to change ’em in each new Library. As always, making a “template” Library that you duplicate to make new Libraries solves this.
 One thing you’ll notice is that Roles function a little differently now. Every “Master” Role always has a default Subrole with the same name. Choose “Music”, and your clip will be assigned a “Music-1” Subrole. As in previous versions, you can rename any Subroles and create custom Master Roles. Essentially each Master Role is now the ‘container’ for all the subroles in it’s category, like an audio buss or group. There’s a very important reason for this which I’ll talk more about below…
Timeline 2.0 – The Timeline!
In the default view, the timeline functions pretty much as it always has. The major difference is that Roles will “stick together” as much as possible. You can now re-arrange the Role order in the timeline by dragging them in the Index. I really love this feature.
Default TL Appearance
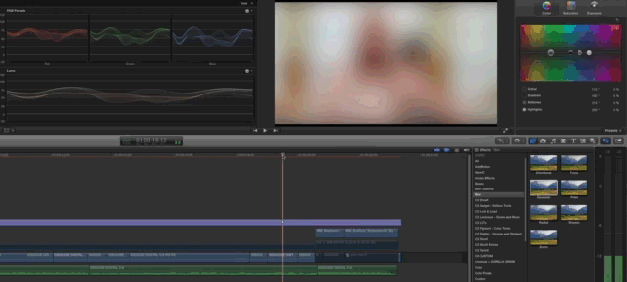
You can also “Focus” on a Role, which minimizes all other clips to almost microscopic size. The crazy thing is that you can still pretty easily work with these minimized clips. It’s a great feature which makes working on Projects with lots of stacked audio clips really really easy. You won’t be setting any keyframes on the minimized clip the timeline, but you can cut, trim, add Effects and transitions etc. It’s a godsend for people with smaller screens.
Effects Role Focus

One difference you’ll note is that clips may not stack quite as tightly as before. Roles can overlap in the default view, and you can still manually arrange clips around vertically, but a “lower” role will never move higher than any vertically adjacent clip from a higher ‘z-order’ Role.
The other difference is that you can no longer put audio only clips above the Primary. Kind of a bummer, but ya gotta break some eggs to make an omelette right? The various Clip Appearance settings are slightly different as well, cycle through them and check it out.
So… that’s the new default view, but there’s another new view that will blow your mind.
The Timeline Superhighway
Welcome to “Lanes View”. Enabling this in the Timeline Index puts each Role in it’s own separate Lane. It’s a new, powerful way of organizing an NLE timeline, without losing the the functionality of the Magnetic Timeline.

You can choose to show one big lane for each Master Role and all it’s Subroles, or expand the view to show a separate Lane for each subrole. Put one Role in Lanes View and leave the others in default view, or any combination you want. Click the “Show Audio Lanes” button to change the entire Timeline view.

It has the visual utility of traditional tracks, without losing any of the Magnetic Timelines’ utility. FCP X had already made traditional tracks seem obsolete, but now Roles and Lanes View make tracks feel positively archaic. You can flip through all these views in real time during playback of course… it’s really amazing what Apple have done here. Here’s a little animation that cycles through all the views, and reorders some Roles.

The usual suspects will now say “FCP X has tracks!”. But this is not “tracks” at all, it’s an entirely new thing. Sure, you can re-order tracks in other NLE’s, but there is nothing that even approaches what the FCP X timeline can do with Roles and Lanes. Not even close. Seriously. Play with it, you’ll see.
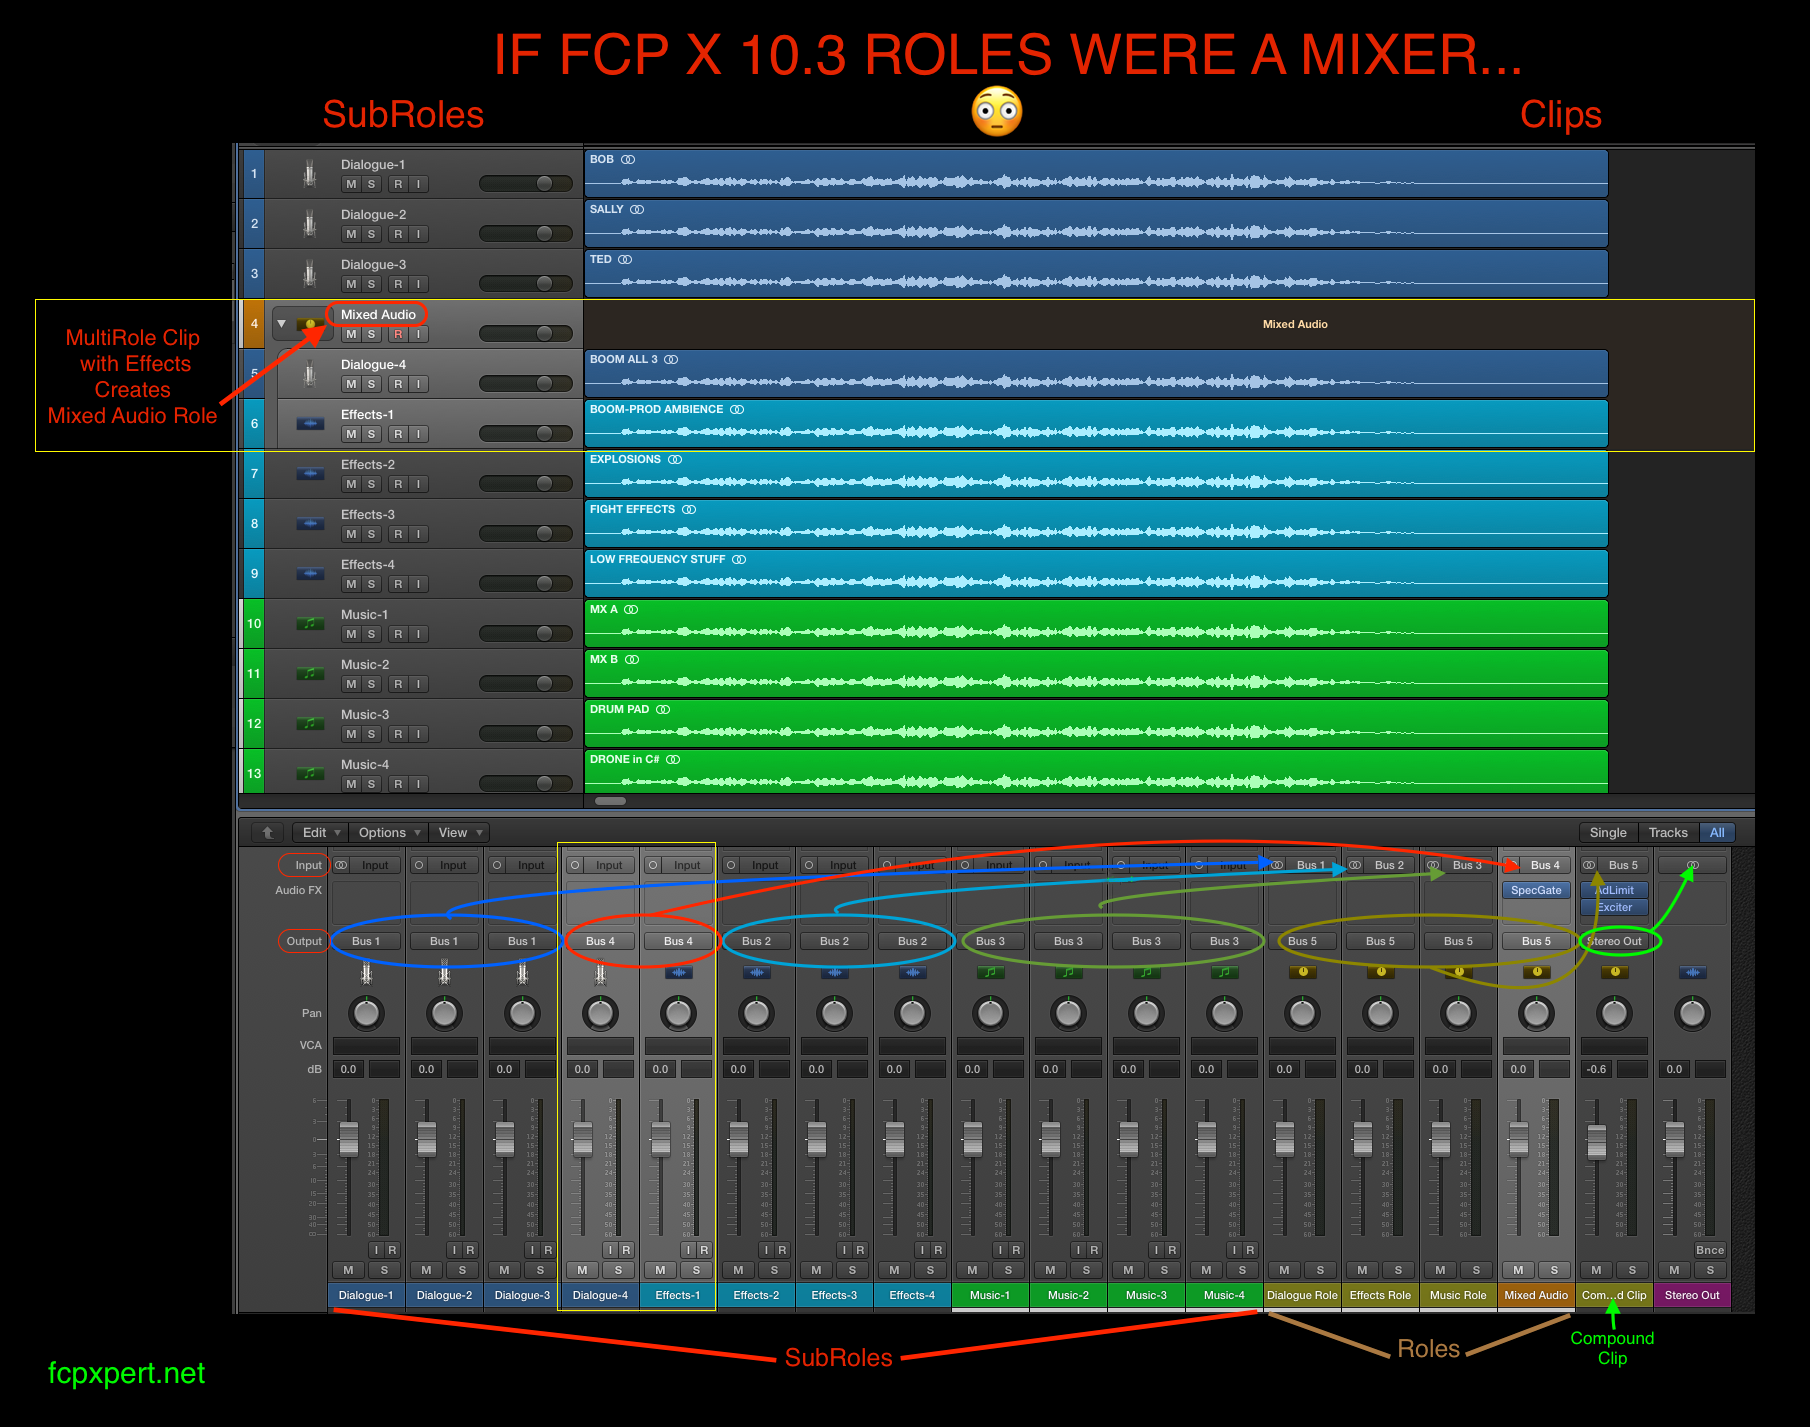
Apply Effects to Compound Clip Roles. (aka groups or busses)
This is a really important new feature. Create a Compound Clip from your Project, select it in the Timeline, and use the “Show Audio Lanes” Button in the TL Index to expand out the individual master roles as clips. You can then apply effects to the Role(s), as well as to the CC “container” itself. Apply a VO preset to a Master VO Role, add some EQ to your Dialogue Role and drop a compressor/Limiter/LUFS Meter on the enclosing CC container for example.
Select the Role (or the Compound Clip) in the Audio Inspector to make adjustments to intrinsic parameters and/or Effects you’ve applied. You can of course adjust levels for each individual master Role as well as the entire CC in the Timeline or Inspector. Essentially each Role in a Compound Clip is like a buss or subgroup that can be treated independently of other Roles and the CC itself. Incredibly useful for mixing and delivery and, if you think about it, there’s a whole world of possibilities this opens up.

What Else?
As noted above and in the Release Notes, there are many more new features, fixes, and improvements in this version. Way too many for me to go into in this post. FCP X 10.3 is also really fast. It opens faster (the UI appears first now, then the Libraries open), and runs as fast or faster than previous versions for me.
Many of the changes made to the Timeline, Roles, etc. open up some very intriguing possibilities for future updates. Also, the majority of the big changes and additions in 10.3 are squarely aimed at professional users, which is a very good thing.
Hey, maybe people will stop whining about Apple not caring about pros now!… Nah, probably not. 😉
Almost more importantly, this version of FCP X is, as usual, a blast to work in. It’s stable, really great to look at, and the timeline view options and other new features are really a joy to use. My advice is to just get it and start poking around, it’s pretty amazing. Open all the Menus, explore the Command Editor… It takes a little while to discover all the new stuff and get used to how it all works, but that’s half the fun!
Should You Update Now?
Yes! With some caveats…
Your existing libraries will be updated in this version. As always, create backup copies before you open them in 10.3. It’s also always a good idea to compress/zip your current versions of the apps just in case. If you’re in the middle of a large job, the old “hold off until it’s done” advice is warranted. That said, I have clearly not heeded that advice. 🙂
Every Library I’ve updated – and I’ve updated some very large Libraries – has been fine. Any small issues I’ve run into have been easy to fix. The longer and more complex your Project the longer it’ll take to QC it in the new version but if you don’t mind spending the time, then go right ahead.
Roles in existing Libraries/Projects that are updated may get a little screwy. I haven’t had any problems here, but be on the lookout for this. Using Lanes view and expanding Subroles makes tracking down stray/incorrect Roles very easy though.
As usual, some 3’rd party plugins may have issues. I have, uh… lots of these, and for the most part everything has been fine. I’ve also heard first hand from some plugin developers that things are actually better with this than previous updates, but keep an eye out.
10.3 updates fcpxml to version 1.6, and apps that use fcpxml may not yet work with fcpxml 1.6. You can optionally export fcpxml 1.5 so in theory you should be OK, but the changes in Roles could cause unexpected problems when exporting to the older version. Again, nothing major that I’ve run into, but if you have mission critical workflows that use fcpxml, I’d run some tests to be sure.
Of note… the latest versions of X2Pro and all the Intelligent Assistance apps work with fcpxml 1.6 now. EDL X works fine if you export fcpxml 1.5, and I expect it will be updated soon if it hasn’t been already.
All in all, this is a very significant update, and it’s now apparent why it took so long. If you like FCP X, you’re gonna love it. If you don’t like FCP X, give this version a try, it may just change your mind. Personally, I have a hard time going back to the “old” version of X when I need to, and working with track based NLE’s is now even more maddening.
FCP X has always had features that are unmatched in any other NLE, and this update has pushed it even further ahead of the pack in many ways. The Pro Apps team have obviously been working their asses off on this, and they’ve knocked it out of the park. Send ’em some flowers or something. 🙂


 The first thing you’ll notice is that the you can’t assign parent Roles to components, you must assign Subroles. When you assign the “Effects” Role, your component is assigned “Effects-1” etc. You can of course rename any Subrole and any Custom parent Roles you create.
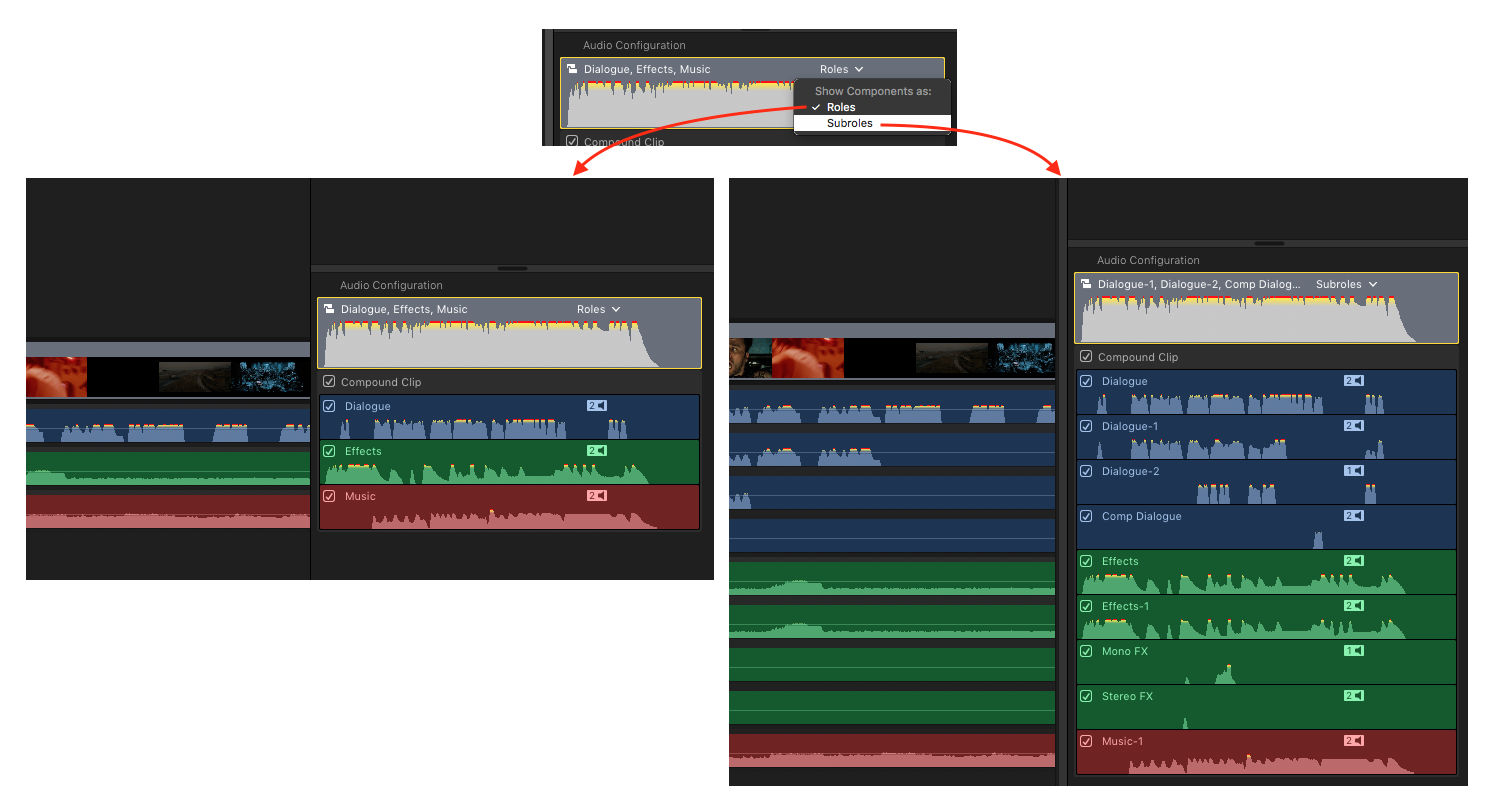
 There are ways to mitigate this. One way is to do most of your mixing when you’re still in the project, make it into a CC, then do a final pass of Mix/EQ/Effects to the Roles and Compound Clip Container only.