In recent twitter post. Ievgenii Larin wrote:
“If you want to grasp the Magnetic Timeline, open Premiere, put a stereo audio clip into a sequence and try to change stereo to dual mono.”
So I did. 🙂
In recent twitter post. Ievgenii Larin wrote:
“If you want to grasp the Magnetic Timeline, open Premiere, put a stereo audio clip into a sequence and try to change stereo to dual mono.”
So I did. 🙂
Here’s the TL;DR version. Pasting text copied from any text app into an FCP X title will change the title font to that of the pasted text. Really cool. Text pasted into the Inspector won’t change the selected style.
EDIT: Works with text copied from a web browser too, So it’s a Mac OS thing, it works when you paste styled text into any text app.

I got this from Brian Elliot Tate, who noticed that if you copy and paste text from a font browser into an X title it will change the font. Here’s a link to the video he made showing this.
So… I poked around a bit and discovered that this works with text copied from anything. Text Edit, Pages, Word, even PDF’s. Any styled text. If you have the font, it’ll work. Try it!
In a recent thread on Creative Cow, we were discussing the difference between Pr CC’s new Essential Graphics Panel and FCP X Motion Templates. As is often the case, it somehow morphed into a discussion of 3D Object creation and animation an NLE. Or something… I dunno, it’s the Cow, it gets weird over there sometimes. 😉
Anyway… at some point I made a quick little animation to show what you could do in FCP X without leaving the NLE. It literally takes 10-15 min to whip up a decent looking animation, and I’m sure it would look better if you spent more time.
Someone then wondered how it was done, so I did it again, and made a little movie showing the entire process. I’m sure there are actual tutorials about doing this if you look around, but here’s the basic idea…
1-find a picture of the object/logo you want to use
2-make it into a font and install the font
3-animate it as 3D text.
Again, other than making the font, this was all done in FCP X without using any 3rd party tools or other programs. It’s very easy. Apple certainly doesn’t advertise FCP X as 3D modeling software, but it’s pretty cool what you can throw together without leaving the timeline. None of this required rendering either, which is a bonus.
Here’s the 15 min process condensed to ~1 minute.
The new Essential Graphics Panel in Premiere is a welcome addition, and is being compared to FCP X’s Motion Templates.
While I’m sure that – like FCP X – 3’rd parties will make some cool stuff, let’s take a quick look at the stock titles in Premiere vs the stock templates in FCP X.
Again, this is only the standard titles included in each app from the factory.
I’ve been working on a cut in FCP X of which I need a working copy in Premiere. So, after a quick run through X to CC, and a not so quick couple hours of cleaning up the FCP 6 XML mess and re-doing the mix, I had it back together.
I used the same Fx Factory effect in both, but had to match an FCP X Look Effect using Lumetri, and export a few speed ramped/retimed audio clips because, well… just because.
Anyway, leaving aside the fact that the the workflow, ease of use, effects application, compositing results and audio quality are markedly better in one of the 2 (guess which one! 😉) it ended up more or less the same. Here’s the question though…
Which of these 2 would you rather look at all day, every day? I mean really… 🙂

Finally! This is something that probably everybody knows, but it’s been driving me crazy for years. “It” is the fact that, if you have multiple Projects open in the Timeline, sometimes they just “randomly” disappear from the Timeline History.
Say I have Projects 1, 2, 3 ,4 ,5 and 6 open. I work on each, open a new one, attempt to go forward to another and… half of them are now gone from the History. Why?!?! Well… here’s why, and it’s really simple.
When you open any Project, it becomes the last thing in your history. So, if you have Projects 1, 2, 3 ,4 ,5 and 6 open, are working on Project 3, and then open a new project (Project 7), Projects 4, 5, and 6 are now gone and 7 is now the last Project in the History.

So, now that I know this… if I want to open a new project and keep my History intact, I just go to the last project in the History, and then open the new Project. Easy.
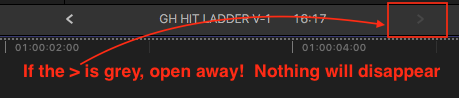
There’s a catch though….
When you open a Compound Clip from a Project Timeline, the Compound Clip becomes the last thing in your history. So, If I want to open a CC from Project 3, and keep 4, 5, 6, and 7 in the History, I go to the Browser and double click Project 3 which then makes it the last thing opened and moves it to the end of the History. So I now have Projects 1, 2, 4, 5, 6, 7, 3 and a CC as my history. Out of order, but all still in the History.
Anyhow… hope you find this helpful, I sure did.
So, I recently cut and finished a trailer for “Grow House”, a comedy from the co-writer of “Friday”. As you may have guessed from the title, the movie revolves around, um… growing marijuana.
I was looking for a little gimmick to use at the end, and I found that there’s a built in “Leaves” wipe in FCP X. It was almost perfect, but needed one, tiny adjustment. 🙂 After a few minutes of messing around, the Weed-Wipe was born.
Now, I don’t condone or encourage any activity that may be implied by this effect, or by the movie, but click the gif below if you’d like your very own copy! (30 MB)

And, if you’d like to see the wipe in action, it’s at the end very not-safe-for-work Red Band trailer. For those who dislike swearing, there’s a Green Band version too!
This was done start to finish in FCP X by the way. the titles were done in After Effects, but everything else; transitions, compositing, CALM Act compliant mix, mastering, was all FCP X.
For the gear-heads who may care, I used a Coremelt C2 transition and Slice-X with Color Finale, FCP Effects Whip Pans, KingLuma Radiance, Rampant 4k Smoke Overlays, Klangfruend LUFS Meter and of course, The Weed Wipe!
I had a question about using Roles to make multiple versions from a single project recently. As I wrote a post about it a while ago, I referred the questioner to that. And, while copying the link, I decide to re-read it. It is very vague and was done before the big 10.3 update. So…
I’ve made a little video that – in my usual rambling semi-coherent fashion – goes into a little more detail about this process. As usual, if you know how to do this it’s nothing new. But if you don’t really get how Roles and Share Presets work, hopefully this will be of some use.
EDIT: Couple things I was vague about (as usual) I wanted to clear up. First, as pointed out in a comment below, you need to set a default Share Destination so you can use the CMD E shortcut properly. You do this in the Destinations Preference tab. EZ.

The other thing, which I can’t stress enough, is how much simpler and less prone to user error it is to spit versions out of FCP X – Even if the spot was cut in another NLE, or onlined somewhere else. Why? Once your Share Presets are created, all the work is done.
You do need to prepare each Project Timeline with the proper Roles and A/V elements, just as you would with your timelines in any other system. But in X, no matter how many cuts you are exporting, once the sequences are prepped you don’t need to touch them. A few other advantages…
No enabling/disabling video or audio tracks for each export.
No need for duplicate sequences. You can export Stereo Comps and/or Multichannel mixed Stereo and mono Splits from a single timeline.
With multiple cuts, no need to repeat/match/copy/paste all your A/V track assignments and audio configurations for every timeline.
I’m not being facetious here. No matter what NLE you use, if you need to export multiple versions of multiple spots with any regularity, you should be using FCP X to do it.
Bored? Wanna listen to me talk about stuff? Check out this episode of FCP Radio. Kudos to Richard Taylor for making my interview sound coherent!
Click the pic and give Episode 34 a listen. 🙂

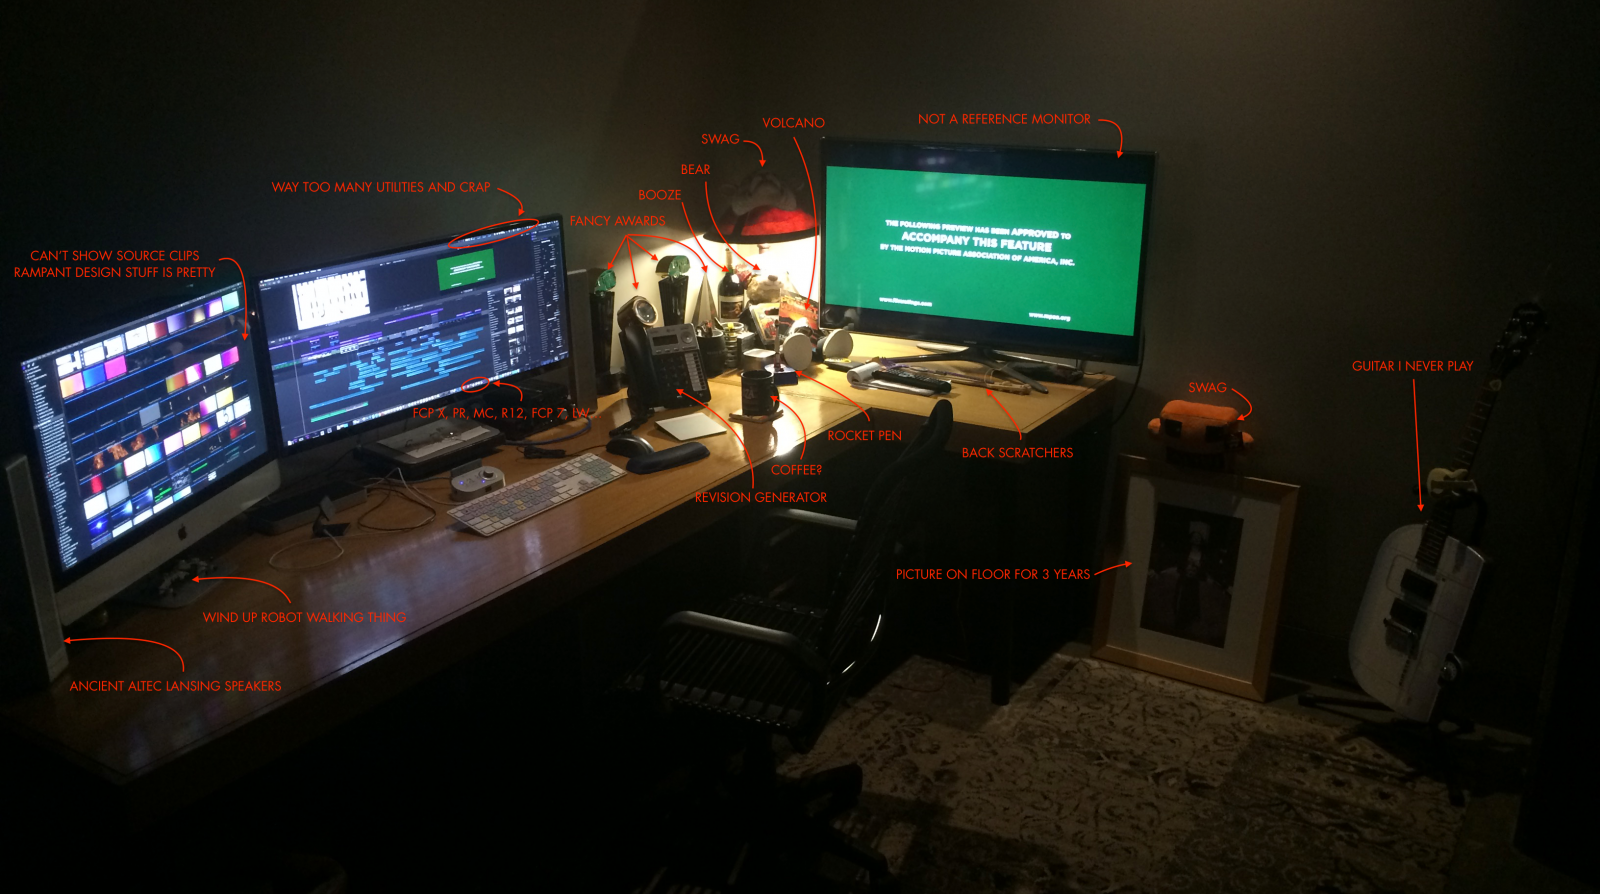
I posted this pic the other day after cleaning my bay. In lieu of actual blog content, I thought I should annotate it. 🙂
... the world from 40,000' at 500 mph.
a blog by Oliver Peters
Just another WordPress.com site
Deep Thoughts about FCP X, and why you should be using it.
