As anyone who produces content for Broadcast or Theatrical Exhibition knows, there are very strict loudness requirements these days. EBU R 128, ATSC A/85 and CALM Act, and many more. And, as usual, there are lots of Meters and Plugins to help you achieve compliance. The problem is, they either don’t play nice with FCP X, and/or they are very expensive.
I was hunting around for a solution today that wouldn’t drain my bank account, and came across the updated version of Klangfreund LUFS Meter, a formerly free plugin with a lot of great features. I’ve tried a bunch of plugins for this, and LUFS Meter is by far the most user friendly. It’s of course designed for DAW’s, but works in FCP X on individual clips, or on a Compound Clip of your mix.
It’s really easy. Make a Compound Clip of your Project, apply the plugin and choose your setting. Play through once to get an analysis, press the “adjust to” button, export your cut and you’re done.
That said, this plugin is quite deep and has a lot of options and advanced settings, but the basic operation is very easy… Kind of like FCP X. 🙂
Press a Button to Make This: Into This:
It’s simple, inexpensive and has worked well for me. I’ve found it to be very transparent sonically, though it’s always best if you start with a mix that isn’t as insanely hot as my example above. Even that mess sounded fine after processing though.
If you need to comply with loudness regulations but don’t want to spend a fortune, you should definitely check it out. The full version is $49, a “light” version is $25, and there’s a demo available with a 60 second analysis limit so you can try it out.
EDIT: OK, this thing is seriously cool… check the manual, but you can apply multiple instances of the plugin, and sync them together. So if you had 3 stems (compound clips) DIA/FX/MX, you can apply a LUFS Meter to each stem, assign them to the same sync group, and control them all at once from any instance. Normally all you need is 1 instance for a comped mix, but this feature could be very handy.
I also found out it’s been tested fairly strenuously with FCP X, unlike any other plugins like the that I’m aware of. If you need to deliver compliant mixes from FCP X, you need this.
About a month ago, I posted a little teaser about a “transformation” effect I made in FCP X for the Nine Lives movie campaign. As the spots are now rolling out, I thought I’d post a bit more detail. First, have a look at the effect, it’s about 10 seconds in:
For the campaign, we have 3 or 4 editors working on different spots in Premiere and FCP 7 (yes, FCP 7…) so, for logistical reasons, I cut this spot in Premiere. Trust me, it would have been easier in X for a number of reasons, but that’s another story…
The tricky part of doing 30’s and 15’s was getting the main character quickly transformed into a cat, it’s not a quick bit at all in the film. And, as I was skimming through some dailies in X… I had an idea. “CoreMelt Drive X has a cool Track Sparks Color effect” I thought, “why not incorporate that and make some ‘magic’ in FCP X?”
So… I made a rough version which was cut into some spots that went to focus groups. Audiences liked it. The marketing folks liked it. The director liked it. It was going into everything, so it was time to make a 2k version for finish. All this was done right in the timeline, I never left FCP X. I used CoremeltSlice-X & Drive-X, the built in Keyer, Draw Mask, Droplet and Glow effects.
STEP 1
Replace Purrkins Head
(can’t show the raw footage… sorry!)
I found a shot where Purrkins (Christopher Walken) gestures in a way where he could maybe be throwing something. Great! Well, except for the fact that he was talking while he did it. So… I had to replace Walkens head. I used slice X to cut it out, then placed another part from the same scene -where he wasn’t talking and looked ominous- under the cutout clip.
I resized the shot and keyframed the movement, then put it in a compound clip so I could fine tune the sizing without screwing up the keyframes from the first pass. Got that done, and exported a comped QuickTime master.
STEP 2
Make Brand Disappear
Again, skimming the dailies, found a long take where Brand (Kevin Spacey) is in the shot, then walks out so there’s a “clean plate”. But of course, the camera moved a little bit in the interim. So, I used the free Andy’s better 3D effect to line up the the empty room with the earlier section with Brand in the shot (seen above in the Secondary). Added a soft edge wipe from top to bottom, done. Put the whole thing into a Compound Clip so I could resize it.
STEP 3
Make Fuzzypants Appear
More dailies skimming… I found a shot of the cat sitting on a green cyc. Keyed him over the empty room part of the previous Compound Clip, resized and flipped him, did some tweaks to try to get him to match the scene, and then cut out a section of the empty room to partially obscure him for some depth. Used opacity to fade him in as Brand fades out… done. Made that chunk into another QT master.
STEP 5
Magic! 🙂
Now to make it all work, hopefully… First I took, the 2 QT comps, and used Coremelt Drive-X to track some magical sparks on them. They were thrown by Purrkins, and then come into the next shot and envelope Brand as he disappears.
I then put these clips into Compound Clips, added an adjustment layer in each one, pasted the Drive-X Effect onto these, and disabled the clips from the film. That left me with just the magic sparks effect that I could tweak as needed. I then copied a bit of one clip to make a little sparkle when the cat appears.
STEP 6
Assemble The Parts
Last step was to duplicate the 2 Comp QT’s and stack them. On the top clip, I keyframed a Draw Mask on each clip to open up the area where the effect should travel. I then stuck the “magic” clips in the middle. On the bottom clip I added a keyframed Droplet effect that followed the magic sparks. Lastly I stuck the little spark for the cat on top.
A little tweaking and… OK, a bunch of tweaking. This is for a worldwide campaign so I wanted it to not suck. I don’t think it’s perfect, but I had to stop somewhere… Once I got it looking decent, I exported it as a 2k ProRes 4444 file, and off it went. If you watch tv, use the internet, or go to the movies you’ll be seeing it.
There’s actually a lot of stuff created in X in all the Nine Lives spots that will start appearing everywhere. Some I cut, some were cut by others. I recreated the Europa logo to freeze the goddess and remove her reflection (too distracting). FCP X 3D text, keyer and draw mask made that easy.
Could I have used other apps for all this? Sure, but why? It was quicker and easier to do all this in FCP X and export as clips that can be used by everyone, regardless of NLE. Everything I need is right in the FCP X timeline.
I would have preferred to cut the spots in FCP X as well, but whatever, I got to do all the fun stuff in it! FCP X is hands down my favorite NLE, but you can do a whole lot more with it than just edit.
Oh, go see the movie, it’s cute and you can safely bring your kids!
As can be inferred from reading anything I post anywhere, I really like FCP X. Apple have, in their words, created “A more advanced take on pro video editing”. FCP X has “Unprecedented power for the next generation of post”, “…A dynamic editing interface (that) lets you experiment freely while working with extraordinary speed and precision”.
The trackless Magnetic Timeline, Roles, Keyword Ranges, Favorite/Reject. Powerful compositing capabilities built in to the NLE, Filmstrip View, the Skimmer, Auditions… the list of innovations goes on and on. Apple has created an amazing, brand new NLE. What they have not done, and have not claimed to have done, is re-invent editing.
I make this distinction because there are some fairly insistent voices on the internets that do make this pompous, counterproductive claim, and I think doing so makes people who are on the fence less likely to give FCP X a fair shot.
Now, I certainly understand being passionate about a platform, I am. And I’m not above spouting a little hyperbole myself, as can be seen on my blog and in my videos and presentations. But I’ve never claimed that Apple have re-invented editing, because they haven’t. What they have done is modernize it in some very helpful ways.
But this post isn’t about how great FCP X is – and it is great. 🙂 What I’d like to address is what I feel is the most egregious inaccuracy that is persistently presented in forums and on blogs… that being, and I’m paraphrasing here: ...in FCP X alone, you can do the majority of your editing in the Browser! You can’t do that in any other NLE!! Um… Not true.
Keyword Ranges and Favorite/Reject are simply a massively improved implementation of subclipping. X takes what was a tedious, mostly manual task, and effectively automates it for you. You create and tag ranges (subclips) and they get put in Collections (bins) for you. And you can tag Ranges (subclips) from within Ranges (subclips) without leaving the master clip. Create “stringouts” in the Browser. Way less clicking and dragging than in any other NLE, it’s really fast and efficient.
But here’s the thing, as anyone who actually uses more than one NLE will tell you… you absolutely can do that in any NLE. What Apple has done with FCP X, is make it wildly simpler. There’s more innovation in the FCP X browser than just Keyword Collections and Ranges, but it’s not a “new” way of editing, it’s a better way of editing.
The bottom line for me, is that FCP X does in 1 step what in other NLE’s require 2 or 3 or 4 etc. You can do many more things, and get better results, right in the FCP X Timeline and without round tripping to other apps. Retiming, Resolution Changes, Keying, Audio and Video Exports with Roles, Compositing, live preview of Effects, on and on.
It’s (mostly) the same stuff you can do in anything, but more efficient, faster, and with less distraction from the software. You can “program” your Library with Smart Collections etc, and then you edit like you always have, but faster, and you don’t have to keep re-organizing things like you do in everything else.
Editing hasn’t changed since the days of razor blades and tape. You get your footage, chop out the crap you don’t want, and assemble the bits you do. Add layers of audio and titles etc, mix it, and you’re done. Videotape was a huge improvement over film, Digital was a huge improvement over tape. The process is the same, the tools we use to accomplish the task have gotten much better.
FCP X is definitely a new, powerful, modern, reinvented NLE. It makes it possible for more people than ever -including “professionals” – to get “professional” results. Video literacy is a skill that, like printing, music creation etc., is now accessible to more people than ever before. And that is a very good thing. 🙂
But Apple has not reinvented editing. What they have done, is make it a whole lot easier. And that works for me, I can go home early. 😉
I’ve been kinda slow posting lately, work is interfering with blogging, so I thought I’d toss this up. This was fun to cut… Effects only, no music, retimed ticking to create a beat, random compositing, overlays, dialog cheating etc.
Cut in X, and turned over to finish via X2Pro, EDL-X and Resolve for a picture AAF. I think they finished on an Avid? Anyway, smooth as silk as usual. Check out the movie too, it’s good. 🙂
We know you’re busy. Very, very busy. So busy, that traditional training takes entirely too much time. At GeekCo., we understand.
Now, with GeekCo Train-O-Matic®™, you can get the training you need to competently cut in Final Cut Pro X in as little as 10 seconds! (depending on reading speed) You can read it here or, assuming you have the time, simply click either image to download a .pdf. Happy Learning™!
“It’s not a place where you are going to store anything. Creating places to store things is really old school and we want to try and break that habit! ” ~Simon Ubsdell
This is pretty cool… Over at the Creative Cow, which is anything but boring, a recent thread about my NAB thing veered off onto a very interesting track. One of the regulars, Simon Ubsdell, came up with a really cool technique which I think you’ll like. Simon is a smart guy, Editor, Motion GFX (and Apple Motion) expert, and partner in Hawaiki, who make arguably some of the best FCP X plugins out there. You should buy them all!
So, without further ado, here it is, One Library, One Event, One Smart Collection to manage all your media. The Future?
I’ve posted about this elsewhere here, but only piecemeal, so I thought it would be helpful to bring it all together in one place so you can see more clearly what I am suggesting. Elsewhere I’ve called it the Dummy Smart Collection method and that sounds kind of fun so I’ll stick with that.
Step One: Open up your Library, which I am assuming has the media you want to work with, organised any which way you choose, or not organised at all.
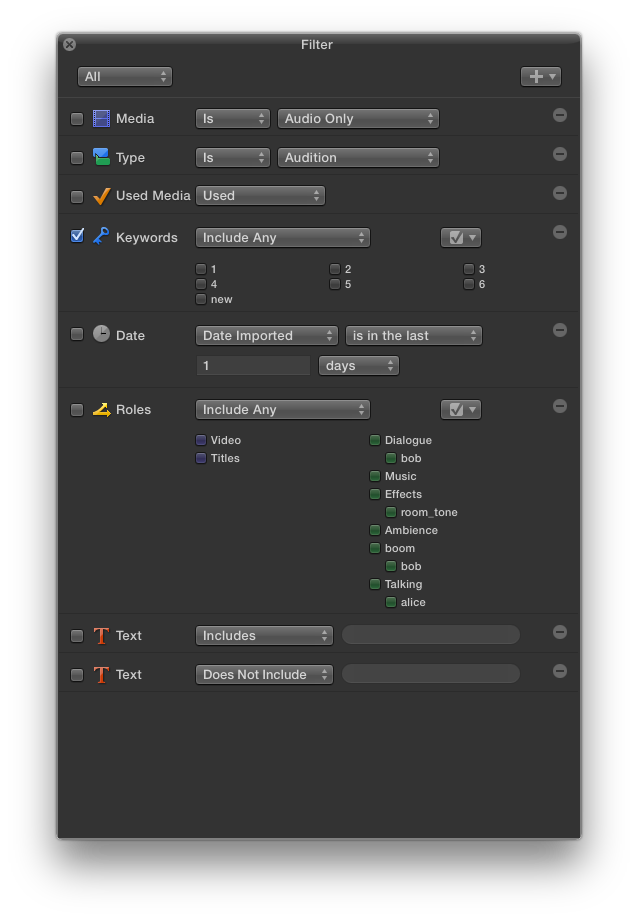
Step Two: Create a new Smart Collection at the Library level (not the Event level) and call it something like “Master Access” and double click it to bring up the Filter window. This is what I’m calling the Dummy Smart Collection.
Step Three: Hide your Library pane. Yes, I mean that!
Step Four: Add all of the Filter options to the Filter pane – leave out any that look like you’d never want them but most of them are pretty useful.
This Filter window is now going to be the Always On, Instant Access control centre for your media. It’s not a place where you are going to store anything. Creating places to store things is really old school and we want to try and break that habit! This is just a place from which you will be accessing all of the media in your Library all of the time, which means its “contents” will constantly be changing.
So for example, we can enable Roles/Include Any/Music in order to access all the music in our library. Or we could do something really useful and enable Used Media in order to see what music we have used in the current Project. That’s cool and super useful.
If we know any of the characters in the filename we are looking for we can simply type in the Text field and enable that. So for example, we could enable Roles/Effects and type “zap” into the Text field to bring up all our Zap sound effects. Or we could use “Media is Stills” to bring up all our stills. Or if we had a Keyword collection called Stock we could bring up all our stock footage by enabling the Stock keyword (very useful if we wanted to isolate all the stock footage used in our current Project, which we could do by enabling Used Media again). But really there are so many options and different ways of accessing your media this way that it’s absurd to try and even begin to list them.
Because the important thing to remember is that we can not only search with one category type, we can have multiple active categories, which means we can really pinpoint what we need in a way that simply isn’t possible using any other means. If we use the old-fashioned method of hunting through Events, Folders and Keyword Collections manually, we can only ever see the contents of one container at a time. Whereas with the Dummy Smart Collection method, we can instantly view media from across multiple containers and that’s a big deal, I think.
And the point is we are doing this with the Library closed! We are not hunting for any Folder, any Event, any Keyword Collection – we’re simply using the Master Access “panel”, as I’m calling the Filter pane. And one of the great things about this Master Access panel is that it’s a floating HUD – I really like that. All my Browser real estate is being used for showing me my media and none is wasted with all that Library clutter.
Here’s a visual aid showing my sift for my zap SFX – note that hidden away there are many other editing projects that you are not seeing but which I can easily access.
So now if we think about our Library organisation, we can start to appreciate that we need a lot less of it than we used to think. We don’t need a Music folder, or a SFX folder, or a Stills folder, because we can use our Dummy Smart Collection to bring them up instantly – and very efficiently because of the complex sort options we have at our fingertips.
Quite how you use Keyword collections within this scheme is really up to you, but you’ll probably find that you need far fewer than you thought you needed. (Events are almost entirely redundant and don’t help with the Dummy Smart Collection because they are not selectable as a Filter option.)
I’ve been very pleasantly surprised at how effective this method is in practice. One of the things you need to bear in mind though is that your media needs either the right filenames, or the right tags, or the right Roles or the right embedded metadata for this method to deliver the best results.
My recommendation would be to think about ways of embedding metadata probably more systematically than you might have done otherwise. Use the Finder (or one of the many utilities available) to tag and/or rename files. If you have files that you want to tag with a date that is different from the Creation Date, then simply modify the filename(s) to add in the date information (easily done as a batch in a single step, so it really isn’t a big deal). Make sure your Roles are properly set up (which you should be doing anyway!). Rename items in the Browser to that they become more useful to you – for example, if you want to organise your sent Projects, you don’t need to put them in a Sent Keyword collection – instead you can simply add “Sent” to the Project name and the Dummy Smart Collection will find them without fuss.
That’s probably enough for now – I haven’t spent that long developing this method but its simplicity and robustness strike me as offering real efficiency savings. The more I work with it, the more benefits I seem to discover, so I hope to be able to add some more useful tips in due course.
Pretty cool idea huh? I’m gonna be using it, though I’m doing a “hybrid” where I still have Collections, Folders etc. But I hope to rarely need to use them. They’re there, but hidden. With proper tagging, I may not need nearly as many! Let us know how it works for you, either here, or on the thread at the Cow.
UPDATE: Simon has made a little tutorial which can be found by clicking here. Check it out and leave comments! 🙂
Man, that logo looks crappy on a black BG… too lazy to fix… Oh, Hi! Going to NAB? Want to go to NAB? If you’re there, I’ll be blabbing about FCP X at a little FCP Exchange presentation on Tuesday at 2:30. Stop by and heckle! Bring your FCP X hating friends! Fun!
I just made a couple 1.85 title safe .png checker overlays if anyone has any use for them. In FCP X, I use a combo of Digital Heavens Grid X, and Andy’s Safe Guides, both free and worth having. We wanted a “prettier” checker for some AE/PS stuff though, so I just rendered these out in 2K 16:9 (2048 x 1152). Grab ’em if you want, the nice thing is they can of course be used in any NLE or Photo/GFX editing software. One has a 20 x 20 grid, the other has 10 x 10. Both have 1.85 crop boundaries, center cross, and title and action safe guides. Just click the image to load the full size version in a new tab and save them to wherever.
Just wanted to share a little story illustrating one of the great things about FCP X… the capabilities you can add to the NLE with 3’rd party apps/plugins. Of course, some people believe that since FCP X doesn’t come with every option under the sun built in, it’s crippled. I am not one of those people. Case in point, Coremelt Slice-X and Track X.
A little back story… when we cut a trailer, we’ll often do a couple versions and let the client pick one, or combine bits from both. Recently, a version that I cut was not chosen (sad face) but a couple pieces from it were put into our other version. One of these bits contained a phone screen replacement I had done using Slice-X and Track X, so I had exported a comp for the other editor to use for the offline. Now, it’s time to finish it. Clean elements were supplied as 2K dpx files, which I exported from Resolve as 2K ProRes 4444 XQ movies to work with.
In addition to this shot, there were 3 other screen replacements that needed to be done, and the original thought was to do those, and redo this one, in After Effects. But, for whatever reason, AE wasn’t happy tracking this shot and Mocha was being… crashy. So rather than waste more time I just rebuilt it in FCP X with the clean 2K elements.
This was a tricky track. The phone was being typed on, so it was jumping around, not a smooth motion. Also, the actors thumb was of course flying all over the place above the screen. I can’t really show the clean shots until the trailer comes out, so I’ve included a blurred version (above) of what I was dealing with. Obviously there’s more to the shot… When the finished piece is out, I’ll update the post with a link, though what’s here will remain blurred and crappy looking. 🙂
EDIT: See the final effect HERE, about 2:20 into the Trailer...
Let me add a disclaimer in advance of any snide comments… I’m sure this could have been done in AE, (or Nuke, Flame etc etc.) but what I was doing in FCP X, right in the NLE, looked great so it was easier just to keep it there.
In the offline version, the Track X replacement went a little nuts when the thumb moved all the way across the screen, so I redid that and after a little futzing around, got a nice, solid, clean replacement. So I could more easily reposition the screen, I exported just that element as a comped movie. Next, I used Slice-X on the original clip to remove the entire screen, including the actors thumb. Those became the base layers.
I then used a fixed draw mask to cut out just the thumb, and used the built in keyer to get rid of the screen. Luckily, it was all shades of blue, and tweaking the key got rid of it all, while leaving the thumb with a clean edge.
Next bit was a tiny slice of the hand between thumb and forefinger that had a blue glow on it, used Slice X to track it, and got rid of the blue using the color board, the skin tone stayed the same so it blended right in, I just used a portion of it at the end and faded it in.
Finished up by adding an adjustment layer with Color Correction applied to get rid of the blue glow left over from the original screen. Since that made a mess of the color in the rest of the shot, I used Slice X to mask out just the phone section of the original shot in another copy of the clip, and placed that over the whole pile. A little tweaking, and it was done. Exported as a 2K 4444 XQ movie, and delivered as .tiff sequences via compressor. EZ. Here’s an annoying gif illustrating the pile of blurred parts with the complete shot blacked out.
As an added bonus, the client called and wanted the phone’s brand logo above the screen “painted out”. Slice X object remover got rid of it easily. Our AE artist said he didn’t think he could have done it any better, and definitely not as quickly. I also ended up doing 2 of the other 3 screen replacements in FCP X, as he was backed up recreating another temp comp I had made, involving turning a bright daytime city shot into a stormy night scene with lightning striking a building. lol That one was pretty complicated, and the AE version looks awesome. As I said, when the trailer is out I’ll link to it here.
Anyway… my point in all this is just to say that 3rd party plugins that add functions to FCP X are not a bad thing at all, quite the opposite actually. No jumping between apps, everything can be done – in this case in 2K with real time playback – without ever leaving the NLE. Yes, you need to bolt on the capabilities you need, but in the end it’s actually cheaper than buying or renting a bunch of specialized apps to do stuff like this. That’s not to say there aren’t plenty of other programs that can do this, there certainly are. But, compared to Premiere and Media composer. FCP X is the only NLE that gives you the capability to do this without ever leaving the timeline. Also, it was easy, and fun. 🙂
P.S. I was taking the screenshots for this on my 3 year old MacBook air. The project actually played in real time with 4+ layers of 2k clips, 3 of which had Coremelt effects, masks, color correction applied. It was a little choppy, but the fact it played at all kind of surprised me.
UPDATE: This post is partially irrelevant. As of Version 10.4.4 disabling (Muting) Roles in the Timeline Index now disables them in exports as well. Consistency! 🙂 But if you were wondering what it used to work like in the olden days… Read on….
As this is a topic that seems to cause some confusion, I thought I’d write a little post about it. It confuses me sometimes too, so this post is also for me… to refer to when my brain freezes up. I’ve included the obligatory video below. It’s too long for a Gif-Tip™, but I’ve tried to be uncharacteristically concise. 🙂
So… there are 3 main ways to mute or disable audio in FCP X, all of which have different results. If you know what’s what, it’ll make your life easier, particularly when exporting movies, audio, or fcpxml to send to translation apps such as X2Pro. Here they is:
Timeline Index
-Turning off the Role in the Timeline Index mutes it for playback, but it will still play if and when you export the Project with a comp mix. You can of course exclude Roles if you export a multitrack Quicktime (for stems, mix minus etc). **Update… as with the Inspector, disabled Roles will not appear in fcpxml exports.
Timeline
-Disabling (Muting) an audio clip or component (multichannel track) in the Timeline (V key) will do what you’d expect, you won’t hear it, and it won’t play in an export. However, it will be shown as enabled in an fcpxml export, and will appear, muted, in anything that uses that xml for translation.
Inspector
-Disabling a clip or component in the Inspector makes it inaudible during Playback and export, it will not be shown in the timeline, and the fcpxml will indicate that it is disabled and it shouldn’t be included in any translations. **There is a preference in X2Pro (and other translation apps) that lets you choose to exclude or include disabled items the AAF.
With multichannel clips, the only way to not have all the components appear in an AAF, is to disable individual components in the Inspector. If you only want CH-1 & 3, you need to uncheck all the others.
** In X2Pro’s preferences, you can choose whether you want disabled clips/components to excluded, or included but muted. Make sure you set it for what you want!
For an exciting moving pictorial version of this post, see below. Hope it helps!

 Into This: