Bored? Wanna listen to me talk about stuff? Check out this episode of FCP Radio. Kudos to Richard Taylor for making my interview sound coherent!
Click the pic and give Episode 34 a listen. 🙂
As can be inferred from reading anything I post anywhere, I really like FCP X. Apple have, in their words, created “A more advanced take on pro video editing”. FCP X has “Unprecedented power for the next generation of post”, “…A dynamic editing interface (that) lets you experiment freely while working with extraordinary speed and precision”.
The trackless Magnetic Timeline, Roles, Keyword Ranges, Favorite/Reject. Powerful compositing capabilities built in to the NLE, Filmstrip View, the Skimmer, Auditions… the list of innovations goes on and on. Apple has created an amazing, brand new NLE. What they have not done, and have not claimed to have done, is re-invent editing.
I make this distinction because there are some fairly insistent voices on the internets that do make this pompous, counterproductive claim, and I think doing so makes people who are on the fence less likely to give FCP X a fair shot.
Now, I certainly understand being passionate about a platform, I am. And I’m not above spouting a little hyperbole myself, as can be seen on my blog and in my videos and presentations. But I’ve never claimed that Apple have re-invented editing, because they haven’t. What they have done is modernize it in some very helpful ways.
But this post isn’t about how great FCP X is – and it is great. 🙂 What I’d like to address is what I feel is the most egregious inaccuracy that is persistently presented in forums and on blogs… that being, and I’m paraphrasing here: ...in FCP X alone, you can do the majority of your editing in the Browser! You can’t do that in any other NLE!! Um… Not true.
Keyword Ranges and Favorite/Reject are simply a massively improved implementation of subclipping. X takes what was a tedious, mostly manual task, and effectively automates it for you. You create and tag ranges (subclips) and they get put in Collections (bins) for you. And you can tag Ranges (subclips) from within Ranges (subclips) without leaving the master clip. Create “stringouts” in the Browser. Way less clicking and dragging than in any other NLE, it’s really fast and efficient.
But here’s the thing, as anyone who actually uses more than one NLE will tell you… you absolutely can do that in any NLE. What Apple has done with FCP X, is make it wildly simpler. There’s more innovation in the FCP X browser than just Keyword Collections and Ranges, but it’s not a “new” way of editing, it’s a better way of editing.
The bottom line for me, is that FCP X does in 1 step what in other NLE’s require 2 or 3 or 4 etc. You can do many more things, and get better results, right in the FCP X Timeline and without round tripping to other apps. Retiming, Resolution Changes, Keying, Audio and Video Exports with Roles, Compositing, live preview of Effects, on and on.
It’s (mostly) the same stuff you can do in anything, but more efficient, faster, and with less distraction from the software. You can “program” your Library with Smart Collections etc, and then you edit like you always have, but faster, and you don’t have to keep re-organizing things like you do in everything else.
Editing hasn’t changed since the days of razor blades and tape. You get your footage, chop out the crap you don’t want, and assemble the bits you do. Add layers of audio and titles etc, mix it, and you’re done. Videotape was a huge improvement over film, Digital was a huge improvement over tape. The process is the same, the tools we use to accomplish the task have gotten much better.
FCP X is definitely a new, powerful, modern, reinvented NLE. It makes it possible for more people than ever -including “professionals” – to get “professional” results. Video literacy is a skill that, like printing, music creation etc., is now accessible to more people than ever before. And that is a very good thing. 🙂
But Apple has not reinvented editing. What they have done, is make it a whole lot easier. And that works for me, I can go home early. 😉
We know you’re busy. Very, very busy. So busy, that traditional training takes entirely too much time. At GeekCo., we understand.
Now, with GeekCo Train-O-Matic®™, you can get the training you need to competently cut in Final Cut Pro X in as little as 10 seconds! (depending on reading speed) You can read it here or, assuming you have the time, simply click either image to download a .pdf. Happy Learning™!
Almost exactly a year ago I started this here blog with a post entitled It Doesn’t Suck. So… I thought it only fitting to revisit the topic, and see what has changed. In a word, in my little corner of the editing world, nothing. It’s as though it’s the first week FCP X came out. “Nobody uses it”… “If it only had tracks”… “It’s iMovie Pro”. It’s like Groundhog Day.
FCP X currently has dozens of unique, workflow and editing enhancing features, things you just can’t get or do in other NLE’s. It’s not the unfinished App that it was when it came out. And like every NLE, there are things that need work. Guess which aspect everyone here likes to talk about… Having never used FCP X for more than an hour of course. I’m still using it every day cutting spots. You’ve probably seen them. But, ya know… nobody uses it.
Meanwhile, in the world outside the relative handful of companies and editors who cut trailers here, lots of people are using it with great success. In L.A., a fairly large movie was just cut in X. There will be more. A lot of people in town are using it for a variety of projects, documentaries, cable shows, network promos. In the rest of the world, even more people have begun to embrace it. The BBC and other large networks. Ad agencies, Music video’s and television shows. Tons of stuff.
A lot of this may be familiar to FCP X users, but for the “nobody uses it” crowd, here are some links:
Honda’s interactive commercial ‘The Other Side’
Editing a Hollywood feature cut on Final Cut Pro X
The BBC adopts Final Cut Pro X for news gathering
Editing the Tour de France on Final Cut Pro X
Adidas 2014 FIFA World Cup commercial edited in Final Cut Pro X
Sony Xperia commercial cut on Final Cut Pro X
Arcade Fire music video cut in FCPX
I could go on and on, and that’s just links from one website. Somebody is using FCP X. Lot’s of somebodies.
Anyway, the good news is that since everyone now loves Premiere so much (it has tracks!) If I need to use it I can run FCP X at the same time (7 and X don’t play well together). If there’s a gig I need to keep in Pr, I’ll do all my selects and stuff in X due to the fact that it’s just better for that. Then, get it all into Pr, and cut in there. When I need to find a random shot, I just go to X, skim around (Hoverscrub? I don’t think so.), find it in a heartbeat, note the TC, then pop back to Pr and locate it. It’s actually faster to do that then hunting around in the morass of bins and folders and subfolders and tabs and panels and meaningless thumbnails that is Premiere. (and to be fair, most other NLE’s too)
I find SFX the same way. Pop into X, arrow key down the list and look at the waveforms as they instantly appear, find the one I need, and go search for it in Pr. Exponentially faster than playing through 100 whooshes to find the one I need. Like, not even in the same league.
Anyway, this post isn’t about that stuff. It’s about the fact that FCP X still doesn’t suck. It’s gotten really, really good in the year since I wrote my original post. It’s being used on some very high end work regularly, and there’s more every day. And yet, here in the little movie marketing world, crickets mostly. I know people are using X here and there, but nobody talks about it. It’s odd. Ah well, I’m happily using it quite successfully, people have no idea what they’re missing. 😉
I’ll end this “anniversary” post with a little quote I ran across the other day. I think it’s appropriate. Happy Editing!
“Generals are notorious for their tendency to ‘fight the last war’ – by using the strategies and tactics of the past to achieve victory in the present. Indeed, we all do this to some extent. Life’s lessons are hard won, and we like to apply them – even when they don’t apply. Sadly enough, fighting the last war is often a losing proposition. Conditions change. Objectives change. Strategies change. And you must change. If you don’t, you lose.”
– Dr. G. Terry Madonna and Dr. Michael Young
Maybe everyone knows this, I didn’t, mainly because I use connected clips, not secondaries, I don’t use audio dissolves much, and if I cut audio in a secondary the stock centered transition works fine most of the time. But, I discovered a little trick to have a nice A/B crossfade and use a transition to create the handles for you, and give you a “thumb” to move the cut point around.
Cut your audio in a secondary and stick a dissolve on the cut. The length doesn’t matter, it will just be a drag handle when you’re done – Then, just expand the audio and adjust/trim the A/B sides and fade handles as you normally would.
It’s really the same as if you just did it without the dissolve, except… you can now select the transition to adjust position of the expanded edit point using the <> + Shift (if needed) keys. Be aware, when it’s expanded, dragging the transition doesn’t move the cut, but when you collapse the audio, you can click and drag the transition and it moves he A/B handles/fades with it. Useful?
EDIT: The dissolve doesn’t do anything once you adjust the A/B handles, and you can pretty much do the same thing by selecting and dragging the edit point. What it does so is create some handles for you, and let you drag the edit point without changing tools. Saves a couple keystrokes and clicks… 🙂
Just a drive by. Work has been interfering with blogging. I hate when that happens.
Like everyone else using X, I’m just waiting for the next update. And if all Apple does is squash bugs and optimize the snot out of it this time, I’ll be happy. 🙂
Back again with more babbling. To recap… some people find… ah, screw it. I had envisioned this topic as a linear series of posts for folks dipping their toes into X, talking about my editing process… A-B-C-D etc. Turns out my brain doesn’t work that way. Maybe that’s why FCP X appeals to me. 😉 So I guess I’m just gonna write a little bit now and again – in no particular order – about unique things I like when working with, rather than against the FCP X timeline. This little post will be about Storylines.
I, and others, have said that the best way to get acclimated to the Magnetic Timeline is to fill the storyline with gap, and cut everything in as connected clips and disconnect the audio. I did it at first. It works kind of like you’re “used to” working. And it sucks.
Or, you could use connected clips but keep the audio components connected to maintain sync. You get the benefit of audio components/expansion too. But it’s a mess.
Or, don’t fight it. Use the Primary Storyline.
All nice and neat. Use the Position Tool (P) to move clips without rippling. Hold the tilde key while adjusting clips (~) to temporarily disable connections. Press and hold tilde (~) then press SHIFT and release both keys to lock connections off. Press tilde again to re-enable connections. This cursor let’s you know connections are disabled.
When working with Connected Clips, if you want to butt clips together and put transitions on them outside the Primary, X will put them in a Secondary Storyline for you.
Making secondaries is really just like making a new track in other NLE’s. But, you only do it if you need one, which you do if you want to put a transition effect between clips. So… why else would you need one?
Well, maybe you’d like to cut a music bed first, lock it, and edit to that… without having each clip of your music cut move because it’s “connected” to the primary clip above it. Maybe you have a bunch of little clips you want to keep together or easily move as a group. Whatever. Think of storylines as tracks you can move around if you want to. Add gap at the front end and pin it to the head of your timeline and it’ll behave exactly like a track.
What you can also do, that you can’t do in tracks, is expand the audio in storyline clips and do a nice manual crossfade. so it takes the place of 2 (or 4) tracks in other NLE’s. And you can select and manipulate clips in a storylne just like any connected clips in the timeline.
Storylines are also useful if you want to keep a group of clips together for visual organization. Again, just like tracks.
Make new Storylines by selecting a clip and hitting CMD-G. If you forward (SHIFT) delete the clip after this, it’ll leave an empty secondary if you need it.
And while you’re at it, Never disconnect your sync audio. Unless you need to cheat some dialog or something, leave the sync audio components with your video clips. If you know there’s a stem you won’t ever need, disable the component for the master clip. In my case, I hardly ever need the Music from a split source, so I just turn it off in the master clip.
That way, every clip I cut in has the sync Dialog and Effects with it. I can turn either on or off in the timeline clip(s) as needed, but it’s always there, I never need to match back to a clip to “find” the audio I didn’t think I needed. This essentially takes the place of track patching, but you only need to do it when you want to, not every freaking time you cut in a clip.
It’s also trivially easy to do an A/V, Video only, or Audio only edit. Hit Shift 1,2, or 3 before you cut in your clip.
Next up (in some random order) Fun with Audio Components, Managing Clip Connections, Compound Clips, The Timeline Index, and anything else I can think of. Happy cutting!
To recap… some people, coming from other NLE’s, find the FCP X Magnetic Timeline… disorienting. And that’s being kind. No tracks, crazy connection lines everywhere, clips jumping around by themselves, it’s a mess! Madness! But… there’s a method to the madness. And when you work with, not against, FCP X Magnetism, it’s quite nice to work in, warts and all.
Now, if you’re happily using X you probably won’t find this too interesting. Like all my babbling, this post is primarily directed at experienced folks who are trying to give X a shot and are getting stuck. And, as usual, I’ll probably skip important things, and dwell on minutiae. Feel free to ask for clarification in the comments.
Also,there will be a Part 3, on this topic. And 4 etc. It seemed like it would be a simple post when I thought of it. Oh well…
Since I usually have fairly uh, busy sequences, I figured the best way to talk about the Magnetic Timeline would be to talk a little about my workflow on a typical project. I fought against magnetism for quite a while, and it kinda sucked. But over time, I’ve stopped fighting it, and grown to (mostly) really like it. Your mileage may vary… 🙂 This isn’t a tutorial, just my experience, so forgive me if I gloss over some things as I go. And I assume you have at least a passing familiarity with FCP X. So… the first, and arguably most important thing you need to do is:
Roles take on the majority of the organizational functions of tracks in other NLE’s. If you don’t set your Roles properly, your Project will quickly become an unmanageable nightmare. This is especially true for audio, as there is generally much more of it in the timeline. In fact, pretty much everything in this post pertains to audio, though what I’ll talk about is generally true of video as well.
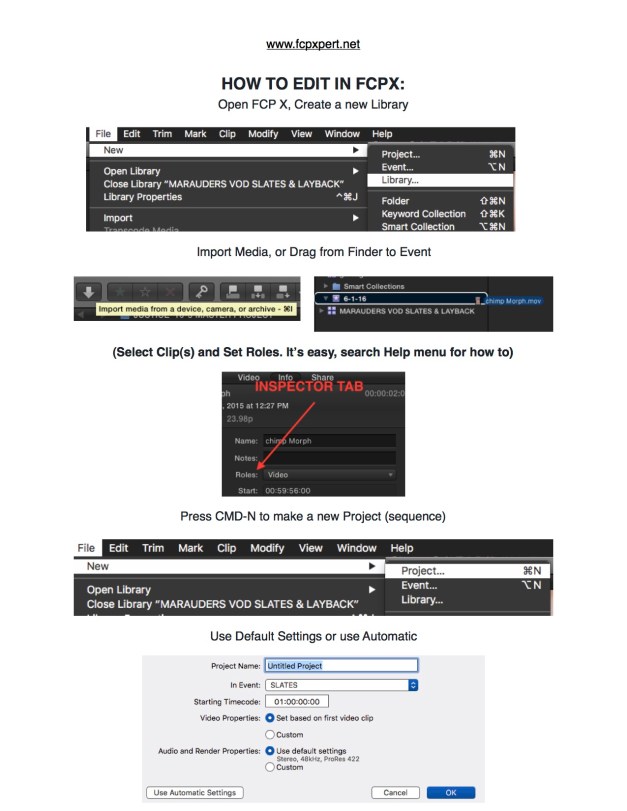
The “built in” Roles in any new Event are Video, Titles, Dialog, Music, and Effects. You can create and assign as many Roles and Sub-Roles as you need. There are a couple custom Roles in the example above. The more detailed your Roles, the more precise your ability to interact with the Timeline will be.
When you import a clip to X, video automatically gets assigned a “video” Role, and any audio with the video gets assigned a “dialog” Role. Imported audio will often get assigned to “dialog”, no matter what it is. Always double check the Role of any clip after you bring it in to an event.
You can assign Roles to clips in the timeline via the Inspector, but it will only change the timeline clip(s). This is quite useful later in an edit for creating sub-roles etc, but do it first in the Browser and it’ll carry into every project in which you use that source.
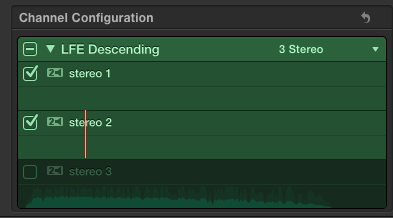
Take a few seconds to do that as you bring in each clip. You can set Roles on multiple clips if you bring in a folder of music or effects or whatever. You’ll be glad you did. Since I generally get video with multichannel split tracks embedded in it, I need to set Roles for the embedded stems in my master source. Select the master clip in the Browser, open it in a Timeline, and set the proper roles for each channel.
In addition to allowing you to do a nice split audio output with the click of a menu or two, Roles allow you to Mute, Solo, Locate, Select and Manipulate clip(s) from the most overlooked (IMO) part of X, the Timeline Index. More on that in, I dunno… Part 3 or something…
I’ll skip over all the other stuff you normally do before starting a sequence… Selects, Favorites, Keywording etc. There are lots of actual tutorials on that. If done right though, it’s really really easy to find footage you’re looking for as you cut.
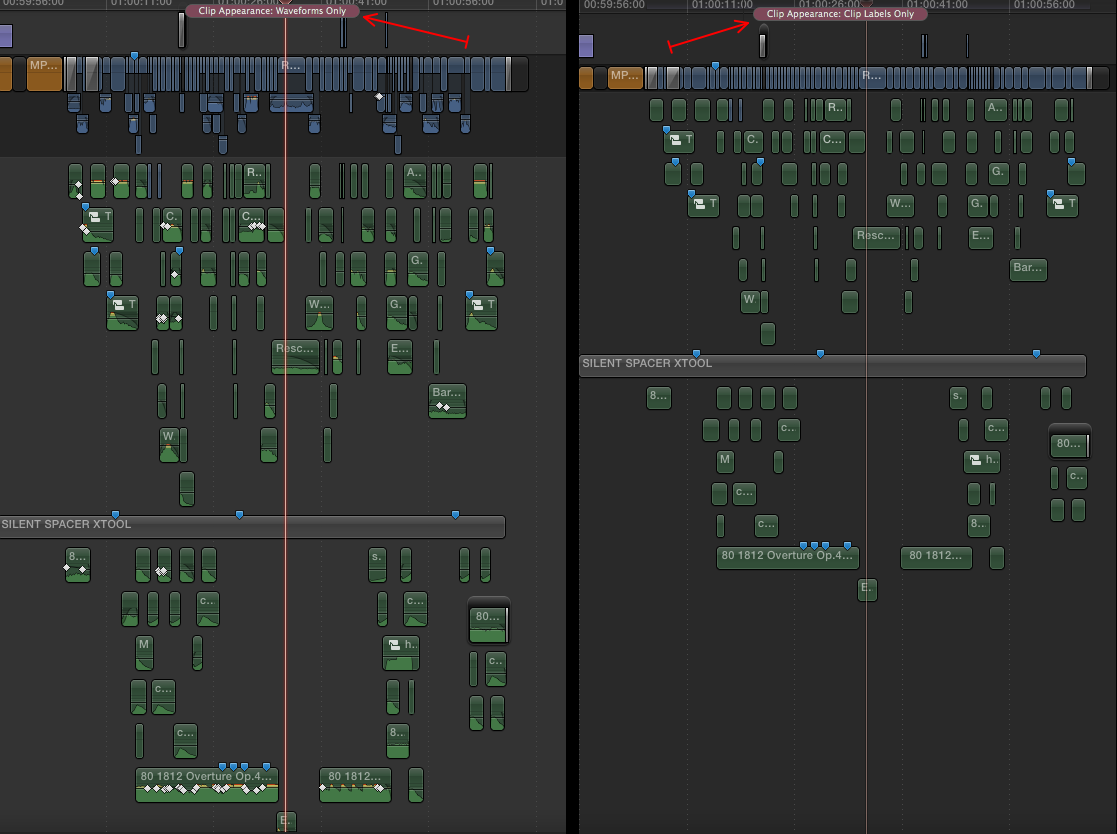
First thing I do is create a new Project, and set a usable view. No giant thumbnails, no connections, and the lowest basic clip height. The examples below are obviously an existing sequence.
I’ve also made custom shortcuts to switch between the “working” view, and a super minimized view that I use when I need to see everything in the timeline.
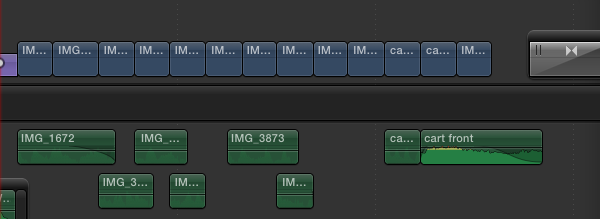
Anyway, back to the empty timeline… I cut a second or so of my main source video in as a connected clip to auto-set the resolution and frame rate. Just my preference, you can manually choose any Project Settings you want when you create your project. Then, I’ll drag out the Gap clip that gets created to some arbitrary length, generally longer than I expect the cut to be. I like to stash unused bits and pieces at the end of the timeline as I go, so this leaves some space to do so.
Next I’ll delete the random clip, cut in my handy slate generator (you can make useful things like this in Motion even if, like me, you have no idea what you’re doing) and start to build the cut.
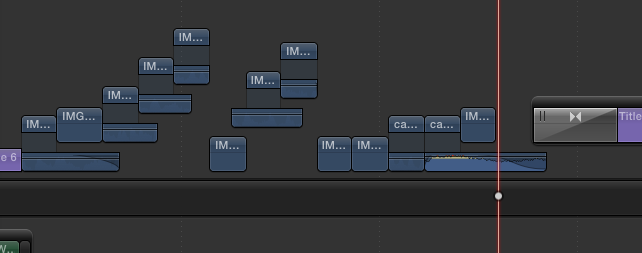
Cutting in FCP X, surprisingly, is just the same as in any NLE. 😉 Just Don’t Fight The Timeline. Observe, see how it works, and go with it. It’s fun! lol I generally assemble things as connected clips, and “commit” them to the Primary when they’re done-ish. Forget about carefully getting the clips to line up horizontally. Let it go. Just stack and drag and trim ’til they’re good and then dump ’em into the primary for fine-tuning.
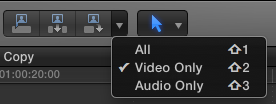
You can drag and drop clips if you want, but there are plenty of Keyboard Shortcuts. Many are the same as in FCP “Classic”. In FCP X, the biggies for me when cutting are Q (connect), W (insert), D (overwrite) and E (append). Use these in conjunction with SHIFT-1 (Audio and Video), SHIFT-2 (Video only), and SHIFT-3 (Audio only). Those’ll get what you want into the cut. In the Timeline, the main ones I use are V (disable/enable the clip), OPTION-S (Solo) , CMD OPTION-S (add to Solo group), CNTRL-S (expand audio/video), CMD-4 (open/close Inspector), CMD-5 (open/close FX Browser). There are a zillion more, and you can of course make your own. Spend some time with the command editor, there’s some great stuff in there!
Also, leave your sync audio connected to video. There are reasons to disconnect it, cheating dialog, using a sync effect in multiple places etc. But in general, don’t. I’ll talk about this more in a future post. 🙂
And with that tease, I guess I’ll stop Part 2 here. In later installments I’ll talk about The Timeline Index, Managing Connections in a complex timeline, Secondary Storylines (tracks!), Compound Clips, fun with Audio Components, and whatever other random, disorganized thoughts pop into my head.
Thanks for stopping by!
What follows is mainly directed at folks who cut in FCP “classic”. It also assumes you either have not used FCP X, or have tried it at some point in the past, stared at it in confusion, and given up. Finally, it assumes that you cut “professionally” and know what you’re doing.
Anyway, first thing you need to do when you open FCP X is . . . forget everything you know. Not about the actual creative process of editing, but the technical process that your brain and muscles have memorized over the years. Tracks, Bins, Subclips, etc. It’s all there but it’s. . . different. X does all the same stuff, some of it better, but it ain’t the same. If you have this attitude:
“I’ve been cutting 40 hours a week for over a decade and I know what I’m doing so just show me how to set I/O’ points and cut clips in and I’m good to go. I can figure the rest out”
. . . you might as well stop now. You’re gonna get confused and annoyed, give up, and become part of the FCPX is no good chorus. You can’t just figure it out without help. You know too much. Trust me on this one. This tip brings me to the first thing you need. Tutorials. Macprovideo, Ripple Training, Lynda, YouTube, there are a million of ’em. Get one. Also, get the GEM manuals here. They’re really inexpensive, and really good. Spend a little time to understand the X workflow, especially the project timeline, before you even launch the app. You’ll spend less time swearing at it. After you’ve gotten a basic understanding of FCP X, Here are a couple other timeline tips/ways of looking at things that might make the transition a little easier. . .
–Forget tracks ever existed. X is clip based. No more patching or track tetris.
-The Skimmer will drive you nuts. Use it. Especially Clip skimming. Don’t fight it, it’s really great once you get used to it.
–The Magnetic Timeline will drive you nuts. Just go with it, you’ll get used to it too, and figure out how to control it. Then you’ll wonder how you ever cut in a “normal” timeline.
–Sync Audio rides with the video, if you have a multichannel source just cut it all in, you can disable/enable the channels later if you need to. If you need to move the audio to cheat dialog or something you can detach it, or expand it in place to edit individual channels. It’s really nice.
–Assign Roles to everything as you import it. Video, Dialog, Music, Effects are in the default list, you can make as many as you need. You can do it at any time, but it’s best to assign Roles to Master clips. You can assign Roles to multichannel sources by opening them in a timeline. Proper assignment of Roles is easy, and really important!
–Everything sticks to whatever it’s connected to in the Primary Storyline and….
–The Primary Storyline works like Media Composer in ripple mode. Gap, the stuff between noncontiguous clips, is treated like media, even though it isn’t. In some ways, the X timeline is easier to “get” if you have some MC experience.
-The Position Tool is your friend. It lets you move stuff around in the primary without Rippling everything.
-The tilde key (~) is your friend too. It overrides clip connections when held down. Also, something you won’t find in the manual… If you press ~ and then SHIFT and release the keys, it locks the override until you hit ~ again. Useful!
–You can work like FCP 7 if you cut in everything as connected clips. You’ll need to make secondaries or move clips to the Primary if you want to add transitions, but it’s great to be able to rough out chunks as connected clips, and then dump each section into the primary once it’s kind of where you want. Popping in and out of the Primary is kind of like having Media Composer and FCP 7/Pr all in one.
–Secondary Storylines are invaluable for things like music beds made from cut up clips that you want to keep together, or may not want to them to move when you move a chunk of video and the clips connected to it. Put these clips in secondaries connected to the Primary at the head of the timeline and they function more or less like tracks used to.
–The timeline index is really useful. Assuming you’ve assigned Roles properly, you can do things like mute, solo, select all clips for particular Roles. And more…
**Edit: 12/21/13 As of FCP 10.1 -The ancient Project Library/Event workflow is gone. It was confusing as hell, and has changed. Ignore anything you hear or read about it. 😉
-Libraries are (kinda) the new Projects They hold a collection of Events and (FCP X) Projects
-Events are (kinda) the new Bins.
–Keyword Collections are the new Folders (though there are still actual folders), Smart Collections are super Folders. 😉
–Projects are the new Sequence
I could prattle on forever, but that’s a start. If you need to move back and forth from X to FCP 7 and/or Premiere, you absolutely can. Easily. 7toX is $10, Xto7 is $50. They work really well, so you have a safety net if you need it. Great to have when you’re just diving in or need to swap stuff with folks on other NLE’s. Getting in and out of MC is do-able, but’s it’s unfortunately a PITA.
You’ve also probably heard that X can’t export OMF’s, EDL’s, Change lists, and other esoteric things that “pro’s” need. And in the app itself, this is technically true. But, believe it or not, not everybody needs this stuff, just like not everybody cutting in FCP 7 needed AAF’s. Remember Automatic Duck? Remember how much it used to cost? Well, If you’re using X and you need these features (I do) for about the same price you can do all those things and more. Smoke and Resolve currently open fcpxml files with no translation, but to talk to other post workflows here’s a little list of the basic stuff you’ll want:
Compressor– $50 – X has a subset of compressor built into it, but for all the random export formats we need, get this. Make presets in compressor, access them from X without switching apps.
Motion– $50 – Open and tweak 90% of X’s built in effects. Make your own effects, generators and lot’s, lot’s more. Get it.
X2Pro – $149 -Makes ProTools (and other DAW) compatible AAF’s. Set your Roles properly and it’ll create a perfectly split out session with 1 or 2 clicks. It’s awesome.
EDL-X – $99 – Generates CMX 3600 EDL’s. Also you can edit the source table, and any markers you add to your sequence will show as comments in the EDL.
Clip Exporter – Free – delivers your entire timeline to After Effects or batch exports selected clips as Quicktime movies or Nuke files.
Resolve Lite – Free – Pretty much the same as the full version but only up to 2k resolution.
That pretty much takes care of the basic post needs and more for $350. Auto duck was $495 before it got EOL’d, so we’ve still got $145 to play with right? So…
Get Slice-X with Mocha for $99. In app Planar Tracking. It’s freaking amazing. Save the rest of your $ to put toward this. It’s in Beta testing now but allows for full 3D .obj files and texture maps, up to 8K in size. Sort of like Element3D inside FCP X.
OK, I really will stop now. But that’s just scratching the surface. Google will find you pretty much anything else you can imagine. Have fun….
“Nobody in town uses it.”
~ the echo chamber
“It” is Final Cut Pro X, which -if you’ve been under a rock for the last 2 years or so- is Apple’s replacement for the aging, but much-loved, Final Cut Pro 7. “Town” is Hollywood CA. And, in the context of this rant, “nobody” is, allegedly, everybody who edits movie trailers and TV commercials for movies. Interestingly, that quote has been repeated to me in the office in which I work. Why interestingly? Because in this office I cut movie trailers and TV commercials for movies. On Final Cut Pro X. Does that seem. . . Odd? It reminds me of. . . something. . . (insert time machine noise here)
A few years before the turn of the century, I worked for a little trailer company in Hollywood. One day in 1999, Apple released a brand new editing program called Final Cut Pro. It looked pretty cool, was relatively inexpensive and I’m kind of a geek, so I immediately bought a copy. I tried cutting something in it. It crashed. At version 1.0, it was kind of useless for what I do. Most “professional” editors believed it was basically a toy. No OMF output. No EDL output. Maybe good for home movies, certainly unsuitable for real work.
But, I kept messing with my little copy at home. After a few updates I felt it kind of was useable, so I brought FCP and my recently retired Performa into my office, set it up next to my Media Composer, and started cutting stuff on it. Media Composer was definitely more “powerful”, but my little FCP rig could do a bunch of stuff MC couldn’t. Also, FCP was kind of fun to cut in.
People at work thought it looked interesting, but didn’t take it seriously. Then, in January or February of 2000 (FCP 1.2?) I somehow managed to get a TV spot cut in FCP approved, and finished . . . maybe it wasn’t so useless. Conveniently, we were needing to replace our aging Avid systems and the folks who ran the place decided to dive into FCP one system at a time. Eventually we switched completely to FCP. Many others followed.
Now clearly, plenty of other people were using FCP, but not in our little trailer-cutting niche. More importantly for FCP’s broad adoption, the first TV show cut in FCP came out at around the same time, the “new” Oxygen Network began using it, eventually somebody cut a “hollywood” film on it, and the floodgates opened. FCP became an “industry standard”. A few more years passed. I went to work at another little trailer company. . .
One day in 2011, Apple released a brand new editing program called Final Cut Pro X. Being a geek, I immediately bought a copy. I opened it up. Tried to cut something in it. It crashed. A lot. It was really weird. It was also really really cool and fun in a lot of ways. But at 1.0 it was not ready for what I do. Like many others, I recoiled in horror, gave up, and continued working away in FCP 7.
But after a few updates that addressed my workflow, I gave it another try. After a bit of hair pulling and a couple tutorials, I discovered I actually liked it. So, I loaded it up on my work system and started cutting stuff on it. Then, in May or June of 2012 (FCPX 10.4?) I somehow managed to get a theatrical :30 trailer cut in FCP X approved, and finished. But things are different this time. . .
In spite of the fact that people in this business have been cutting real, national spots in FCPX for well over a year, despite the fact that one can quickly do quality graphics and compositing in X that would normally need to be done in another application, despite all the features of X that make life as an editor easier, many people in the trailer business still don’t take FCP X seriously. Nobody wants to try it because. . . nobody wants to try it. Honestly, had that attitude been prevalent 15 years ago, there probably wouldn’t have been a Final Cut 7 to cling to like a sinking lifeboat. It’s time to let go.
That’s not to say there haven’t been legitimate reasons not to use X. When it came out, FCPX wasn’t even close to being ready to do everything that FCP 7 could do. That is no longer true. If you now, for some reason, require fixed tracks or another specific feature (that is actually missing, not rumored to be) then it may not be for you. If you learn it, and just don’t like it, fine. But there’s another, illegitimate reason people don’t give it a shot. Apple botched the launch of FCP X. It looked like iMovie and they “killed” FC Studio which, even though it still works, made people feel that Apple was “abandoning” pros. That scared a lot of people off initially, including me.
I spent the first year of FCP X’s existence re-learning the MC interface and learning the much improved Premiere. Fine NLE’s, but they just didn’t have the same “feeling” as good old FCP. And FCP X just sat there on my system, getting updated, but not getting used. Until the point alluded to above that I felt that if I did something with X, I could get it out to finish. So I waded back in. Now, my hair pulling moments come when I’m in FCP 7 or Premiere. There are still things other NLE’s do better than X, and there are things X does better than the others, some things X does others can’t do and vice-versa. And there are some things that you can only do in FCP X. But because of the initial bad taste people got, there’s still a ton of wrong information floating around in the echo chamber.
Despite what you may have heard, you can exchange sequences from X with FCP 7 and Premiere in both directions. For X, the one big sticking point has been the ability to easily share work in a multi (FCP X)-editor workflow. It’s do-able now, but kind of confusing.
[UPDATE: This was written before 10.1 was released. Now, sharing stuff works almost exactly as before, maybe easier. Export XML of Project, Event, or Library from one system, import into another. EZ]
Current versions of Resolve, Smoke, Logic and others all open FCP X projects. It’s likely that a lot of other things will be able to interact with X as well pretty soon. In our little niche we need EDL’s and AAF’s, and for what Automatic Duck used to cost you can do all that and get enough really cool plugins to make your head explode. And cutting in X is fun. That’s right, Fun.
At this point FCP X is a viable replacement for the original FCP. It’s different. You can’t just jump into it. You need to take the time to learn it. But, as someone who does this for a living, believe me, it’s worth it. If you’re an Avid person, stick with MC. If you like Premiere, stick with it. But if, like me, you’re someone who really likes cutting in FCP 7, I’ll just say this. . . once you learn how FCP X works, once you get past the point of having to figure out which button/keystroke/menu/window does what, once you get comfortable with it, it feels the same. It’s hard to define, but. . . you know what I mean.
If you cut on FCP “classic”, unless you just freeze your system in time, you’re going to have to learn a new NLE. If you run a company based on FCP “classic” you’re going to have to switch NLE’s. And the prevailing wisdom is that FCP X is not a viable choice. “Nobody in town uses it.” Well, the prevailing wisdom is. . . misinformed. I use it. There are plenty of others who use it. If you need to switch from FCP 7 – and you do – you should give X a try.
... the world from 40,000' at 500 mph.
a blog by Oliver Peters
Just another WordPress.com site
Deep Thoughts about FCP X, and why you should be using it.